
AWS (S3, CloudFront, ALB)
Learn how to implementat TollBit with Amazon S3, ALB, and/or CloudFront.
Allow TollBit's IP Addresses
RequiredTollBit must be able to reach your sites. We request your pages to set up your Agent Site. If our requests are blocked, challenged, or rate-limited, your Agent Site will not work correctly.
TollBit sends these requests from a fixed set of static IP addresses, published at https://tollbit.com/static-ips.txt. At the time of writing, the list is:
52.22.183.94
3.220.109.109
Always use the published list as the source of truth, and check it again if TollBit tells you it has changed.
Our requests use the user agent tollbot/1.0, so you may see it show up in your logs.
Make sure these addresses are allowed through every security layer that could block or challenge our requests. This applies to every hostname you onboard with us:
- AWS WAF: the rules in your Web ACL, including IP set rules, rate-based rules, and managed rule groups such as Bot Control.
- Any firewall or WAF in front of your origin servers, including security groups and any protection outside of AWS.
If you are unsure whether your configuration blocks us, contact [email protected] and we will confirm from our side.
Steps for Analytics
Forwarding Logs with ALB
To forward logs from an ALB, follow these steps outlined in the AWS docs.
Once you have started forwarding your logs to an S3 bucket, create an IAM policy to allow TollBit to access your logs: If your logs are already being sent to an S3 bucket, add the following IAM policy to your bucket to enable TollBit to process your logs:
{
  "Version": "2012-10-17",
  "Statement": [
    {
      "Sid": "AllowTollbitAccountsAccess",
      "Effect": "Allow",
      "Principal": {
        "AWS": [
          "arn:aws:iam::339712821696:root",
          "arn:aws:iam::654654318267:root"
        ]
      },
      "Action": ["s3:GetObject*", "s3:ListBucket*"],
      "Resource": [
        "arn:aws:s3:::YOUR-BUCKET-NAME",
        "arn:aws:s3:::YOUR-BUCKET-NAME/*"
      ]
    }
  ]
}
Once you have created the policy, reach out to [email protected] to coordinate with our engineering team on the rest of the TollBit Analytics setup.
To finalize your setup, we will need access to the directory in your S3 bucket where your logs are stored, along with the pattern for how the logs are stored for instance /service/logs/2024/12/04/log-file
Pro TipIf your bucket has ACLs, follow the instructions here.
Forwarding Logs with Cloudfront
To forward logs from Cloudfront follow these steps:
Enable standard logging for your Cloudfront distribution following the AWS docs.
Point your logs at an S3 Bucket. Note, we only currently support the default w3c, tab delimited format with the default 33 fields that are included in the logs. If you wish to use JSON and/or modify the fields that Cloudfront logs, please reach out to [email protected] and we can get that set up for you.
Create the following IAM policy for your bucket to allow TollBit to process your logs: If your logs are already being sent to an S3 bucket, add the following IAM policy to your bucket to enable TollBit to process your logs:
{
  "Version": "2012-10-17",
  "Statement": [
    {
      "Sid": "AllowTollbitAccountsAccess",
      "Effect": "Allow",
      "Principal": {
        "AWS": [
          "arn:aws:iam::339712821696:root",
          "arn:aws:iam::654654318267:root"
        ]
      },
      "Action": ["s3:GetObject*", "s3:ListBucket*"],
      "Resource": [
        "arn:aws:s3:::YOUR-BUCKET-NAME",
        "arn:aws:s3:::YOUR-BUCKET-NAME/*"
      ]
    }
  ]
}
Once you have started forwarding your logs to an S3 bucket, and granted TollBit access, reach out to [email protected] to coordinate with our engineering team on the rest of the TollBit Analytics setup. To finalize your setup, we will need access to the directory in your S3 bucket where your logs are stored, along with the pattern for how the logs are stored for instance /service/logs/2024/12/04/log-file
Pro TipIf your bucket has ACLs, follow the instructions here.
Steps for Agent Site
AWS WAF + CloudFront Function Route To Agent Site (Recommended)
This is the recommended way to route bots to your Agent Site when your site is behind CloudFront. It uses a CloudFront Function on the Viewer request event to switch the origin for bot requests, so CloudFront fetches the page from your Agent Site directly. There is no Lambda to deploy and also works with CloudFront VPC origins, which do not support Lambda@Edge on origin events.
NoteA CloudFront behavior can only have one CloudFront Function on each event. If you previously set up Agent Site via redirection with a CloudFront Function, this function replaces it. Remove the redirect function from the behavior when you attach this one.
Set up Your WAF
First, go to the WAF & Shield and create a new Web ACL. Ensure that the ACL being created is for CloudFront distributions. Add your existing CloudFront distribution to this ACL under the "Associated AWS resources" section of the page.
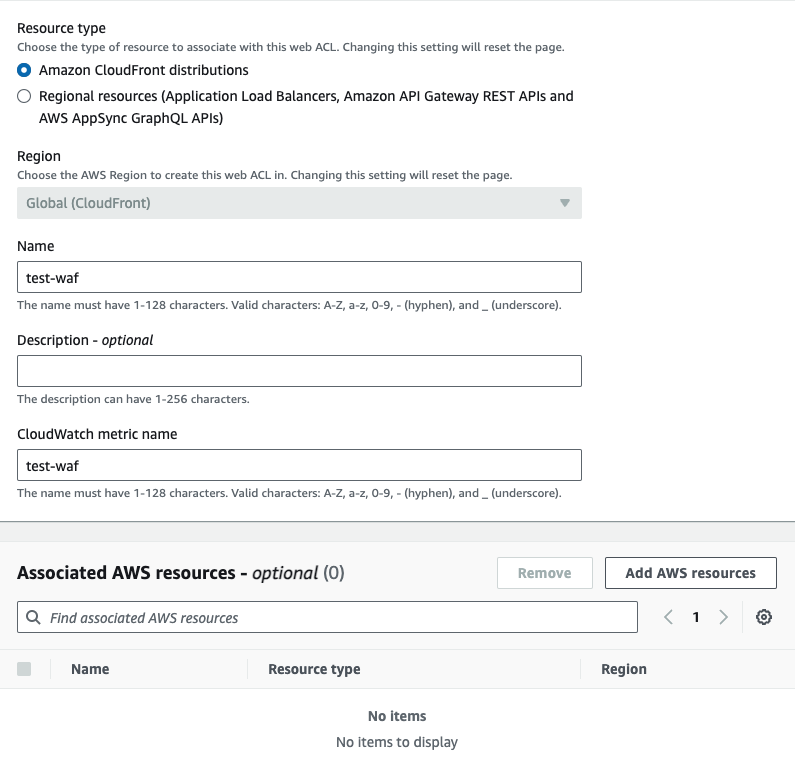
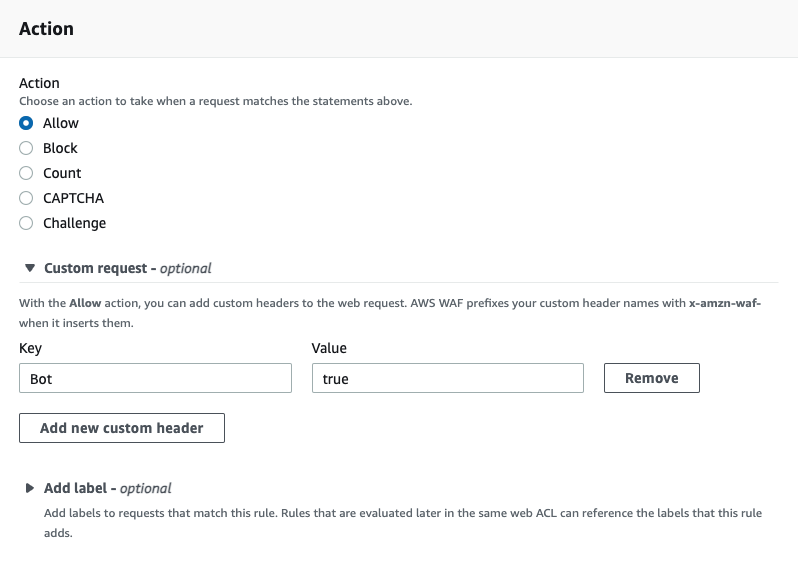
Once you've created the ACL, you can choose any rules you'd like to enable bot detection. AWS Marketplace has managed bot detection rules that you can add to your ACL. We will provide our own WAF rule as well. To use our WAF rule, select the option for using your own rules and rule groups, and use the JSON editor. Note that the rule here has it at priority 0, which means that it will evaluate before other WAF rules. If you have existing WAF rules, please update the priority to when it makes sense to evaluate this in your stack.
{
"Name": "cloudfront-agent-rule",
"Priority": 0,
"Statement": {
"OrStatement": {
"Statements": [
{
"ByteMatchStatement": {
"SearchString": "agentnativesearchbot",
"FieldToMatch": {
"SingleHeader": {
"Name": "user-agent"
}
},
"TextTransformations": [
{
"Priority": 0,
"Type": "LOWERCASE"
}
],
"PositionalConstraint": "CONTAINS"
}
},
{
"ByteMatchStatement": {
"SearchString": "ai2bot",
"FieldToMatch": {
"SingleHeader": {
"Name": "user-agent"
}
},
"TextTransformations": [
{
"Priority": 0,
"Type": "LOWERCASE"
}
],
"PositionalConstraint": "CONTAINS"
}
},
{
"ByteMatchStatement": {
"SearchString": "aionbot",
"FieldToMatch": {
"SingleHeader": {
"Name": "user-agent"
}
},
"TextTransformations": [
{
"Priority": 0,
"Type": "LOWERCASE"
}
],
"PositionalConstraint": "CONTAINS"
}
},
{
"ByteMatchStatement": {
"SearchString": "aiwebindex",
"FieldToMatch": {
"SingleHeader": {
"Name": "user-agent"
}
},
"TextTransformations": [
{
"Priority": 0,
"Type": "LOWERCASE"
}
],
"PositionalConstraint": "CONTAINS"
}
},
{
"ByteMatchStatement": {
"SearchString": "amazonbot",
"FieldToMatch": {
"SingleHeader": {
"Name": "user-agent"
}
},
"TextTransformations": [
{
"Priority": 0,
"Type": "LOWERCASE"
}
],
"PositionalConstraint": "CONTAINS"
}
},
{
"ByteMatchStatement": {
"SearchString": "amzn-searchbot",
"FieldToMatch": {
"SingleHeader": {
"Name": "user-agent"
}
},
"TextTransformations": [
{
"Priority": 0,
"Type": "LOWERCASE"
}
],
"PositionalConstraint": "CONTAINS"
}
},
{
"ByteMatchStatement": {
"SearchString": "amzn-user",
"FieldToMatch": {
"SingleHeader": {
"Name": "user-agent"
}
},
"TextTransformations": [
{
"Priority": 0,
"Type": "LOWERCASE"
}
],
"PositionalConstraint": "CONTAINS"
}
},
{
"ByteMatchStatement": {
"SearchString": "anthropic-ai",
"FieldToMatch": {
"SingleHeader": {
"Name": "user-agent"
}
},
"TextTransformations": [
{
"Priority": 0,
"Type": "LOWERCASE"
}
],
"PositionalConstraint": "CONTAINS"
}
},
{
"ByteMatchStatement": {
"SearchString": "atevesearchsourceurldiscovery",
"FieldToMatch": {
"SingleHeader": {
"Name": "user-agent"
}
},
"TextTransformations": [
{
"Priority": 0,
"Type": "LOWERCASE"
}
],
"PositionalConstraint": "CONTAINS"
}
},
{
"ByteMatchStatement": {
"SearchString": "azureai-searchbot",
"FieldToMatch": {
"SingleHeader": {
"Name": "user-agent"
}
},
"TextTransformations": [
{
"Priority": 0,
"Type": "LOWERCASE"
}
],
"PositionalConstraint": "CONTAINS"
}
},
{
"ByteMatchStatement": {
"SearchString": "bravebot",
"FieldToMatch": {
"SingleHeader": {
"Name": "user-agent"
}
},
"TextTransformations": [
{
"Priority": 0,
"Type": "LOWERCASE"
}
],
"PositionalConstraint": "CONTAINS"
}
},
{
"ByteMatchStatement": {
"SearchString": "bytespider",
"FieldToMatch": {
"SingleHeader": {
"Name": "user-agent"
}
},
"TextTransformations": [
{
"Priority": 0,
"Type": "LOWERCASE"
}
],
"PositionalConstraint": "CONTAINS"
}
},
{
"ByteMatchStatement": {
"SearchString": "ccbot",
"FieldToMatch": {
"SingleHeader": {
"Name": "user-agent"
}
},
"TextTransformations": [
{
"Priority": 0,
"Type": "LOWERCASE"
}
],
"PositionalConstraint": "CONTAINS"
}
},
{
"ByteMatchStatement": {
"SearchString": "chatgpt-user",
"FieldToMatch": {
"SingleHeader": {
"Name": "user-agent"
}
},
"TextTransformations": [
{
"Priority": 0,
"Type": "LOWERCASE"
}
],
"PositionalConstraint": "CONTAINS"
}
},
{
"ByteMatchStatement": {
"SearchString": "claude-code",
"FieldToMatch": {
"SingleHeader": {
"Name": "user-agent"
}
},
"TextTransformations": [
{
"Priority": 0,
"Type": "LOWERCASE"
}
],
"PositionalConstraint": "CONTAINS"
}
},
{
"ByteMatchStatement": {
"SearchString": "claude-searchbot",
"FieldToMatch": {
"SingleHeader": {
"Name": "user-agent"
}
},
"TextTransformations": [
{
"Priority": 0,
"Type": "LOWERCASE"
}
],
"PositionalConstraint": "CONTAINS"
}
},
{
"ByteMatchStatement": {
"SearchString": "claude-user",
"FieldToMatch": {
"SingleHeader": {
"Name": "user-agent"
}
},
"TextTransformations": [
{
"Priority": 0,
"Type": "LOWERCASE"
}
],
"PositionalConstraint": "CONTAINS"
}
},
{
"ByteMatchStatement": {
"SearchString": "claude-web",
"FieldToMatch": {
"SingleHeader": {
"Name": "user-agent"
}
},
"TextTransformations": [
{
"Priority": 0,
"Type": "LOWERCASE"
}
],
"PositionalConstraint": "CONTAINS"
}
},
{
"ByteMatchStatement": {
"SearchString": "claude/",
"FieldToMatch": {
"SingleHeader": {
"Name": "user-agent"
}
},
"TextTransformations": [
{
"Priority": 0,
"Type": "LOWERCASE"
}
],
"PositionalConstraint": "CONTAINS"
}
},
{
"ByteMatchStatement": {
"SearchString": "claudebot",
"FieldToMatch": {
"SingleHeader": {
"Name": "user-agent"
}
},
"TextTransformations": [
{
"Priority": 0,
"Type": "LOWERCASE"
}
],
"PositionalConstraint": "CONTAINS"
}
},
{
"ByteMatchStatement": {
"SearchString": "cloudflarebrowserrenderingcrawler",
"FieldToMatch": {
"SingleHeader": {
"Name": "user-agent"
}
},
"TextTransformations": [
{
"Priority": 0,
"Type": "LOWERCASE"
}
],
"PositionalConstraint": "CONTAINS"
}
},
{
"ByteMatchStatement": {
"SearchString": "cohere-ai",
"FieldToMatch": {
"SingleHeader": {
"Name": "user-agent"
}
},
"TextTransformations": [
{
"Priority": 0,
"Type": "LOWERCASE"
}
],
"PositionalConstraint": "CONTAINS"
}
},
{
"ByteMatchStatement": {
"SearchString": "comet/",
"FieldToMatch": {
"SingleHeader": {
"Name": "user-agent"
}
},
"TextTransformations": [
{
"Priority": 0,
"Type": "LOWERCASE"
}
],
"PositionalConstraint": "CONTAINS"
}
},
{
"ByteMatchStatement": {
"SearchString": "cursor/",
"FieldToMatch": {
"SingleHeader": {
"Name": "user-agent"
}
},
"TextTransformations": [
{
"Priority": 0,
"Type": "LOWERCASE"
}
],
"PositionalConstraint": "CONTAINS"
}
},
{
"ByteMatchStatement": {
"SearchString": "desearchbot",
"FieldToMatch": {
"SingleHeader": {
"Name": "user-agent"
}
},
"TextTransformations": [
{
"Priority": 0,
"Type": "LOWERCASE"
}
],
"PositionalConstraint": "CONTAINS"
}
},
{
"ByteMatchStatement": {
"SearchString": "devin/",
"FieldToMatch": {
"SingleHeader": {
"Name": "user-agent"
}
},
"TextTransformations": [
{
"Priority": 0,
"Type": "LOWERCASE"
}
],
"PositionalConstraint": "CONTAINS"
}
},
{
"ByteMatchStatement": {
"SearchString": "diffbot",
"FieldToMatch": {
"SingleHeader": {
"Name": "user-agent"
}
},
"TextTransformations": [
{
"Priority": 0,
"Type": "LOWERCASE"
}
],
"PositionalConstraint": "CONTAINS"
}
},
{
"ByteMatchStatement": {
"SearchString": "duckassistbot",
"FieldToMatch": {
"SingleHeader": {
"Name": "user-agent"
}
},
"TextTransformations": [
{
"Priority": 0,
"Type": "LOWERCASE"
}
],
"PositionalConstraint": "CONTAINS"
}
},
{
"ByteMatchStatement": {
"SearchString": "exabot",
"FieldToMatch": {
"SingleHeader": {
"Name": "user-agent"
}
},
"TextTransformations": [
{
"Priority": 0,
"Type": "LOWERCASE"
}
],
"PositionalConstraint": "CONTAINS"
}
},
{
"ByteMatchStatement": {
"SearchString": "exasearchbot",
"FieldToMatch": {
"SingleHeader": {
"Name": "user-agent"
}
},
"TextTransformations": [
{
"Priority": 0,
"Type": "LOWERCASE"
}
],
"PositionalConstraint": "CONTAINS"
}
},
{
"ByteMatchStatement": {
"SearchString": "exauser",
"FieldToMatch": {
"SingleHeader": {
"Name": "user-agent"
}
},
"TextTransformations": [
{
"Priority": 0,
"Type": "LOWERCASE"
}
],
"PositionalConstraint": "CONTAINS"
}
},
{
"ByteMatchStatement": {
"SearchString": "fellou",
"FieldToMatch": {
"SingleHeader": {
"Name": "user-agent"
}
},
"TextTransformations": [
{
"Priority": 0,
"Type": "LOWERCASE"
}
],
"PositionalConstraint": "CONTAINS"
}
},
{
"ByteMatchStatement": {
"SearchString": "gensparkbot",
"FieldToMatch": {
"SingleHeader": {
"Name": "user-agent"
}
},
"TextTransformations": [
{
"Priority": 0,
"Type": "LOWERCASE"
}
],
"PositionalConstraint": "CONTAINS"
}
},
{
"ByteMatchStatement": {
"SearchString": "githubcopilotruntime",
"FieldToMatch": {
"SingleHeader": {
"Name": "user-agent"
}
},
"TextTransformations": [
{
"Priority": 0,
"Type": "LOWERCASE"
}
],
"PositionalConstraint": "CONTAINS"
}
},
{
"ByteMatchStatement": {
"SearchString": "goose/",
"FieldToMatch": {
"SingleHeader": {
"Name": "user-agent"
}
},
"TextTransformations": [
{
"Priority": 0,
"Type": "LOWERCASE"
}
],
"PositionalConstraint": "CONTAINS"
}
},
{
"ByteMatchStatement": {
"SearchString": "gptbot",
"FieldToMatch": {
"SingleHeader": {
"Name": "user-agent"
}
},
"TextTransformations": [
{
"Priority": 0,
"Type": "LOWERCASE"
}
],
"PositionalConstraint": "CONTAINS"
}
},
{
"ByteMatchStatement": {
"SearchString": "grok-agent",
"FieldToMatch": {
"SingleHeader": {
"Name": "user-agent"
}
},
"TextTransformations": [
{
"Priority": 0,
"Type": "LOWERCASE"
}
],
"PositionalConstraint": "CONTAINS"
}
},
{
"ByteMatchStatement": {
"SearchString": "grokbot",
"FieldToMatch": {
"SingleHeader": {
"Name": "user-agent"
}
},
"TextTransformations": [
{
"Priority": 0,
"Type": "LOWERCASE"
}
],
"PositionalConstraint": "CONTAINS"
}
},
{
"ByteMatchStatement": {
"SearchString": "hermes-agent",
"FieldToMatch": {
"SingleHeader": {
"Name": "user-agent"
}
},
"TextTransformations": [
{
"Priority": 0,
"Type": "LOWERCASE"
}
],
"PositionalConstraint": "CONTAINS"
}
},
{
"ByteMatchStatement": {
"SearchString": "iaskspider",
"FieldToMatch": {
"SingleHeader": {
"Name": "user-agent"
}
},
"TextTransformations": [
{
"Priority": 0,
"Type": "LOWERCASE"
}
],
"PositionalConstraint": "CONTAINS"
}
},
{
"ByteMatchStatement": {
"SearchString": "ibou-search",
"FieldToMatch": {
"SingleHeader": {
"Name": "user-agent"
}
},
"TextTransformations": [
{
"Priority": 0,
"Type": "LOWERCASE"
}
],
"PositionalConstraint": "CONTAINS"
}
},
{
"ByteMatchStatement": {
"SearchString": "iboubot",
"FieldToMatch": {
"SingleHeader": {
"Name": "user-agent"
}
},
"TextTransformations": [
{
"Priority": 0,
"Type": "LOWERCASE"
}
],
"PositionalConstraint": "CONTAINS"
}
},
{
"ByteMatchStatement": {
"SearchString": "isonsearchbot",
"FieldToMatch": {
"SingleHeader": {
"Name": "user-agent"
}
},
"TextTransformations": [
{
"Priority": 0,
"Type": "LOWERCASE"
}
],
"PositionalConstraint": "CONTAINS"
}
},
{
"ByteMatchStatement": {
"SearchString": "keenable",
"FieldToMatch": {
"SingleHeader": {
"Name": "user-agent"
}
},
"TextTransformations": [
{
"Priority": 0,
"Type": "LOWERCASE"
}
],
"PositionalConstraint": "CONTAINS"
}
},
{
"ByteMatchStatement": {
"SearchString": "kimi-searchbot",
"FieldToMatch": {
"SingleHeader": {
"Name": "user-agent"
}
},
"TextTransformations": [
{
"Priority": 0,
"Type": "LOWERCASE"
}
],
"PositionalConstraint": "CONTAINS"
}
},
{
"ByteMatchStatement": {
"SearchString": "kimibot",
"FieldToMatch": {
"SingleHeader": {
"Name": "user-agent"
}
},
"TextTransformations": [
{
"Priority": 0,
"Type": "LOWERCASE"
}
],
"PositionalConstraint": "CONTAINS"
}
},
{
"ByteMatchStatement": {
"SearchString": "lightpanda",
"FieldToMatch": {
"SingleHeader": {
"Name": "user-agent"
}
},
"TextTransformations": [
{
"Priority": 0,
"Type": "LOWERCASE"
}
],
"PositionalConstraint": "CONTAINS"
}
},
{
"ByteMatchStatement": {
"SearchString": "linkupbot",
"FieldToMatch": {
"SingleHeader": {
"Name": "user-agent"
}
},
"TextTransformations": [
{
"Priority": 0,
"Type": "LOWERCASE"
}
],
"PositionalConstraint": "CONTAINS"
}
},
{
"ByteMatchStatement": {
"SearchString": "manus-user",
"FieldToMatch": {
"SingleHeader": {
"Name": "user-agent"
}
},
"TextTransformations": [
{
"Priority": 0,
"Type": "LOWERCASE"
}
],
"PositionalConstraint": "CONTAINS"
}
},
{
"ByteMatchStatement": {
"SearchString": "meta-externalagent",
"FieldToMatch": {
"SingleHeader": {
"Name": "user-agent"
}
},
"TextTransformations": [
{
"Priority": 0,
"Type": "LOWERCASE"
}
],
"PositionalConstraint": "CONTAINS"
}
},
{
"ByteMatchStatement": {
"SearchString": "meta-externalfetcher",
"FieldToMatch": {
"SingleHeader": {
"Name": "user-agent"
}
},
"TextTransformations": [
{
"Priority": 0,
"Type": "LOWERCASE"
}
],
"PositionalConstraint": "CONTAINS"
}
},
{
"ByteMatchStatement": {
"SearchString": "meta-webindexer",
"FieldToMatch": {
"SingleHeader": {
"Name": "user-agent"
}
},
"TextTransformations": [
{
"Priority": 0,
"Type": "LOWERCASE"
}
],
"PositionalConstraint": "CONTAINS"
}
},
{
"ByteMatchStatement": {
"SearchString": "mistralai-user",
"FieldToMatch": {
"SingleHeader": {
"Name": "user-agent"
}
},
"TextTransformations": [
{
"Priority": 0,
"Type": "LOWERCASE"
}
],
"PositionalConstraint": "CONTAINS"
}
},
{
"ByteMatchStatement": {
"SearchString": "mojeekbot",
"FieldToMatch": {
"SingleHeader": {
"Name": "user-agent"
}
},
"TextTransformations": [
{
"Priority": 0,
"Type": "LOWERCASE"
}
],
"PositionalConstraint": "CONTAINS"
}
},
{
"ByteMatchStatement": {
"SearchString": "mysearchbot",
"FieldToMatch": {
"SingleHeader": {
"Name": "user-agent"
}
},
"TextTransformations": [
{
"Priority": 0,
"Type": "LOWERCASE"
}
],
"PositionalConstraint": "CONTAINS"
}
},
{
"ByteMatchStatement": {
"SearchString": "oai-adsbot",
"FieldToMatch": {
"SingleHeader": {
"Name": "user-agent"
}
},
"TextTransformations": [
{
"Priority": 0,
"Type": "LOWERCASE"
}
],
"PositionalConstraint": "CONTAINS"
}
},
{
"ByteMatchStatement": {
"SearchString": "oai-searchbot",
"FieldToMatch": {
"SingleHeader": {
"Name": "user-agent"
}
},
"TextTransformations": [
{
"Priority": 0,
"Type": "LOWERCASE"
}
],
"PositionalConstraint": "CONTAINS"
}
},
{
"ByteMatchStatement": {
"SearchString": "openclaw",
"FieldToMatch": {
"SingleHeader": {
"Name": "user-agent"
}
},
"TextTransformations": [
{
"Priority": 0,
"Type": "LOWERCASE"
}
],
"PositionalConstraint": "CONTAINS"
}
},
{
"ByteMatchStatement": {
"SearchString": "perplexity-user",
"FieldToMatch": {
"SingleHeader": {
"Name": "user-agent"
}
},
"TextTransformations": [
{
"Priority": 0,
"Type": "LOWERCASE"
}
],
"PositionalConstraint": "CONTAINS"
}
},
{
"ByteMatchStatement": {
"SearchString": "perplexity/",
"FieldToMatch": {
"SingleHeader": {
"Name": "user-agent"
}
},
"TextTransformations": [
{
"Priority": 0,
"Type": "LOWERCASE"
}
],
"PositionalConstraint": "CONTAINS"
}
},
{
"ByteMatchStatement": {
"SearchString": "perplexitybot",
"FieldToMatch": {
"SingleHeader": {
"Name": "user-agent"
}
},
"TextTransformations": [
{
"Priority": 0,
"Type": "LOWERCASE"
}
],
"PositionalConstraint": "CONTAINS"
}
},
{
"ByteMatchStatement": {
"SearchString": "rednote-websearch-bot",
"FieldToMatch": {
"SingleHeader": {
"Name": "user-agent"
}
},
"TextTransformations": [
{
"Priority": 0,
"Type": "LOWERCASE"
}
],
"PositionalConstraint": "CONTAINS"
}
},
{
"ByteMatchStatement": {
"SearchString": "reflectionbot",
"FieldToMatch": {
"SingleHeader": {
"Name": "user-agent"
}
},
"TextTransformations": [
{
"Priority": 0,
"Type": "LOWERCASE"
}
],
"PositionalConstraint": "CONTAINS"
}
},
{
"ByteMatchStatement": {
"SearchString": "shap-user",
"FieldToMatch": {
"SingleHeader": {
"Name": "user-agent"
}
},
"TextTransformations": [
{
"Priority": 0,
"Type": "LOWERCASE"
}
],
"PositionalConstraint": "CONTAINS"
}
},
{
"ByteMatchStatement": {
"SearchString": "shapbot",
"FieldToMatch": {
"SingleHeader": {
"Name": "user-agent"
}
},
"TextTransformations": [
{
"Priority": 0,
"Type": "LOWERCASE"
}
],
"PositionalConstraint": "CONTAINS"
}
},
{
"ByteMatchStatement": {
"SearchString": "sofyabot",
"FieldToMatch": {
"SingleHeader": {
"Name": "user-agent"
}
},
"TextTransformations": [
{
"Priority": 0,
"Type": "LOWERCASE"
}
],
"PositionalConstraint": "CONTAINS"
}
},
{
"ByteMatchStatement": {
"SearchString": "talarionsearchbot",
"FieldToMatch": {
"SingleHeader": {
"Name": "user-agent"
}
},
"TextTransformations": [
{
"Priority": 0,
"Type": "LOWERCASE"
}
],
"PositionalConstraint": "CONTAINS"
}
},
{
"ByteMatchStatement": {
"SearchString": "timpibot",
"FieldToMatch": {
"SingleHeader": {
"Name": "user-agent"
}
},
"TextTransformations": [
{
"Priority": 0,
"Type": "LOWERCASE"
}
],
"PositionalConstraint": "CONTAINS"
}
},
{
"ByteMatchStatement": {
"SearchString": "youbot",
"FieldToMatch": {
"SingleHeader": {
"Name": "user-agent"
}
},
"TextTransformations": [
{
"Priority": 0,
"Type": "LOWERCASE"
}
],
"PositionalConstraint": "CONTAINS"
}
}
]
}
},
"VisibilityConfig": {
"SampledRequestsEnabled": true,
"CloudWatchMetricsEnabled": true,
"MetricName": "cloudfront-agent-rule"
},
"Action": {
"Allow": {
"CustomRequestHandling": {
"InsertHeaders": [
{
"Name": "Bot",
"Value": "true"
}
]
}
}
}
}This will detect the top known AI bots. Next, for the action, be sure to choose "Allow" and to add a custom header. Ours is called bot, and is what we'll use as the example for the rest of the documentation.
Add Your Agent Site as an Origin to CloudFront
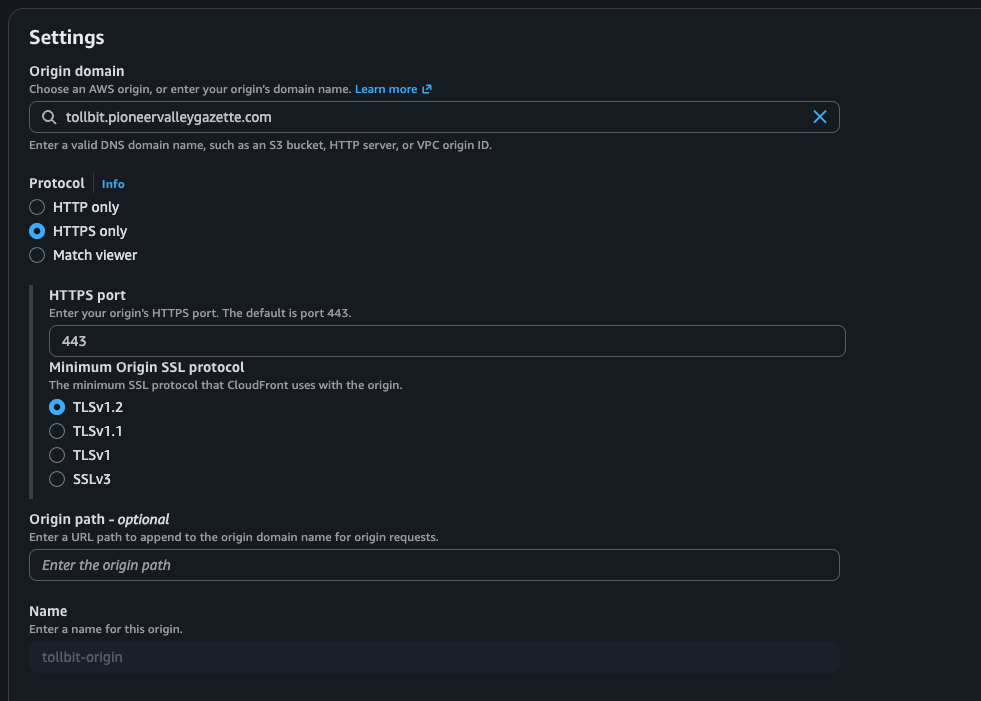
Go to Distribution → Origins and click Create origin:
- Origin domain: your site's TollBit subdomain, for example
tollbit.example.com - Name:
tollbit-origin. The function below refers to the origin by this name. Note that the default name of the origin is yourtollbitsubdomain, so make sure to update this. - Protocol: HTTPS only
- Minimum origin SSL protocol: TLSv1.2
Leave everything else at its defaults. Your behaviors keep pointing at your existing origin. The function switches individual bot requests over to this one.
Pro TipBefore adding the origin, ensure that your site's
tollbitsubdomain is set up and running correctly. CloudFront connects to it over HTTPS, and its certificate is only issued once the subdomain is active.If your distribution serves more than one website, use the Origin request Lambda@Edge setup further down instead. It can work out the right Agent Site for each site at request time.
Update Your Cache Policy
This step keeps a human from being served a bot response, and a bot from being served a human response. The integration will not work correctly without it.
Go to CloudFront → Policies → Cache and create a cache policy. You can also edit your existing one, as long as it is not an AWS managed policy, since those cannot be edited.
If your behavior currently uses an AWS managed policy such as CachingOptimized, a new policy does not inherit its settings. Copy them over before adding the header, in particular Compression support for Gzip and Brotli and the Default and Maximum TTL values. Otherwise your site loses compression and its caching behavior changes when you switch policies.
- Under Headers, choose Include the following headers and add
x-amzn-waf-bot, along with any viewer headers your caching already relies on, such asCloudFront-Viewer-Country. - Set Minimum TTL to
0. - Leave query strings and cookies matching whatever your distribution uses today.
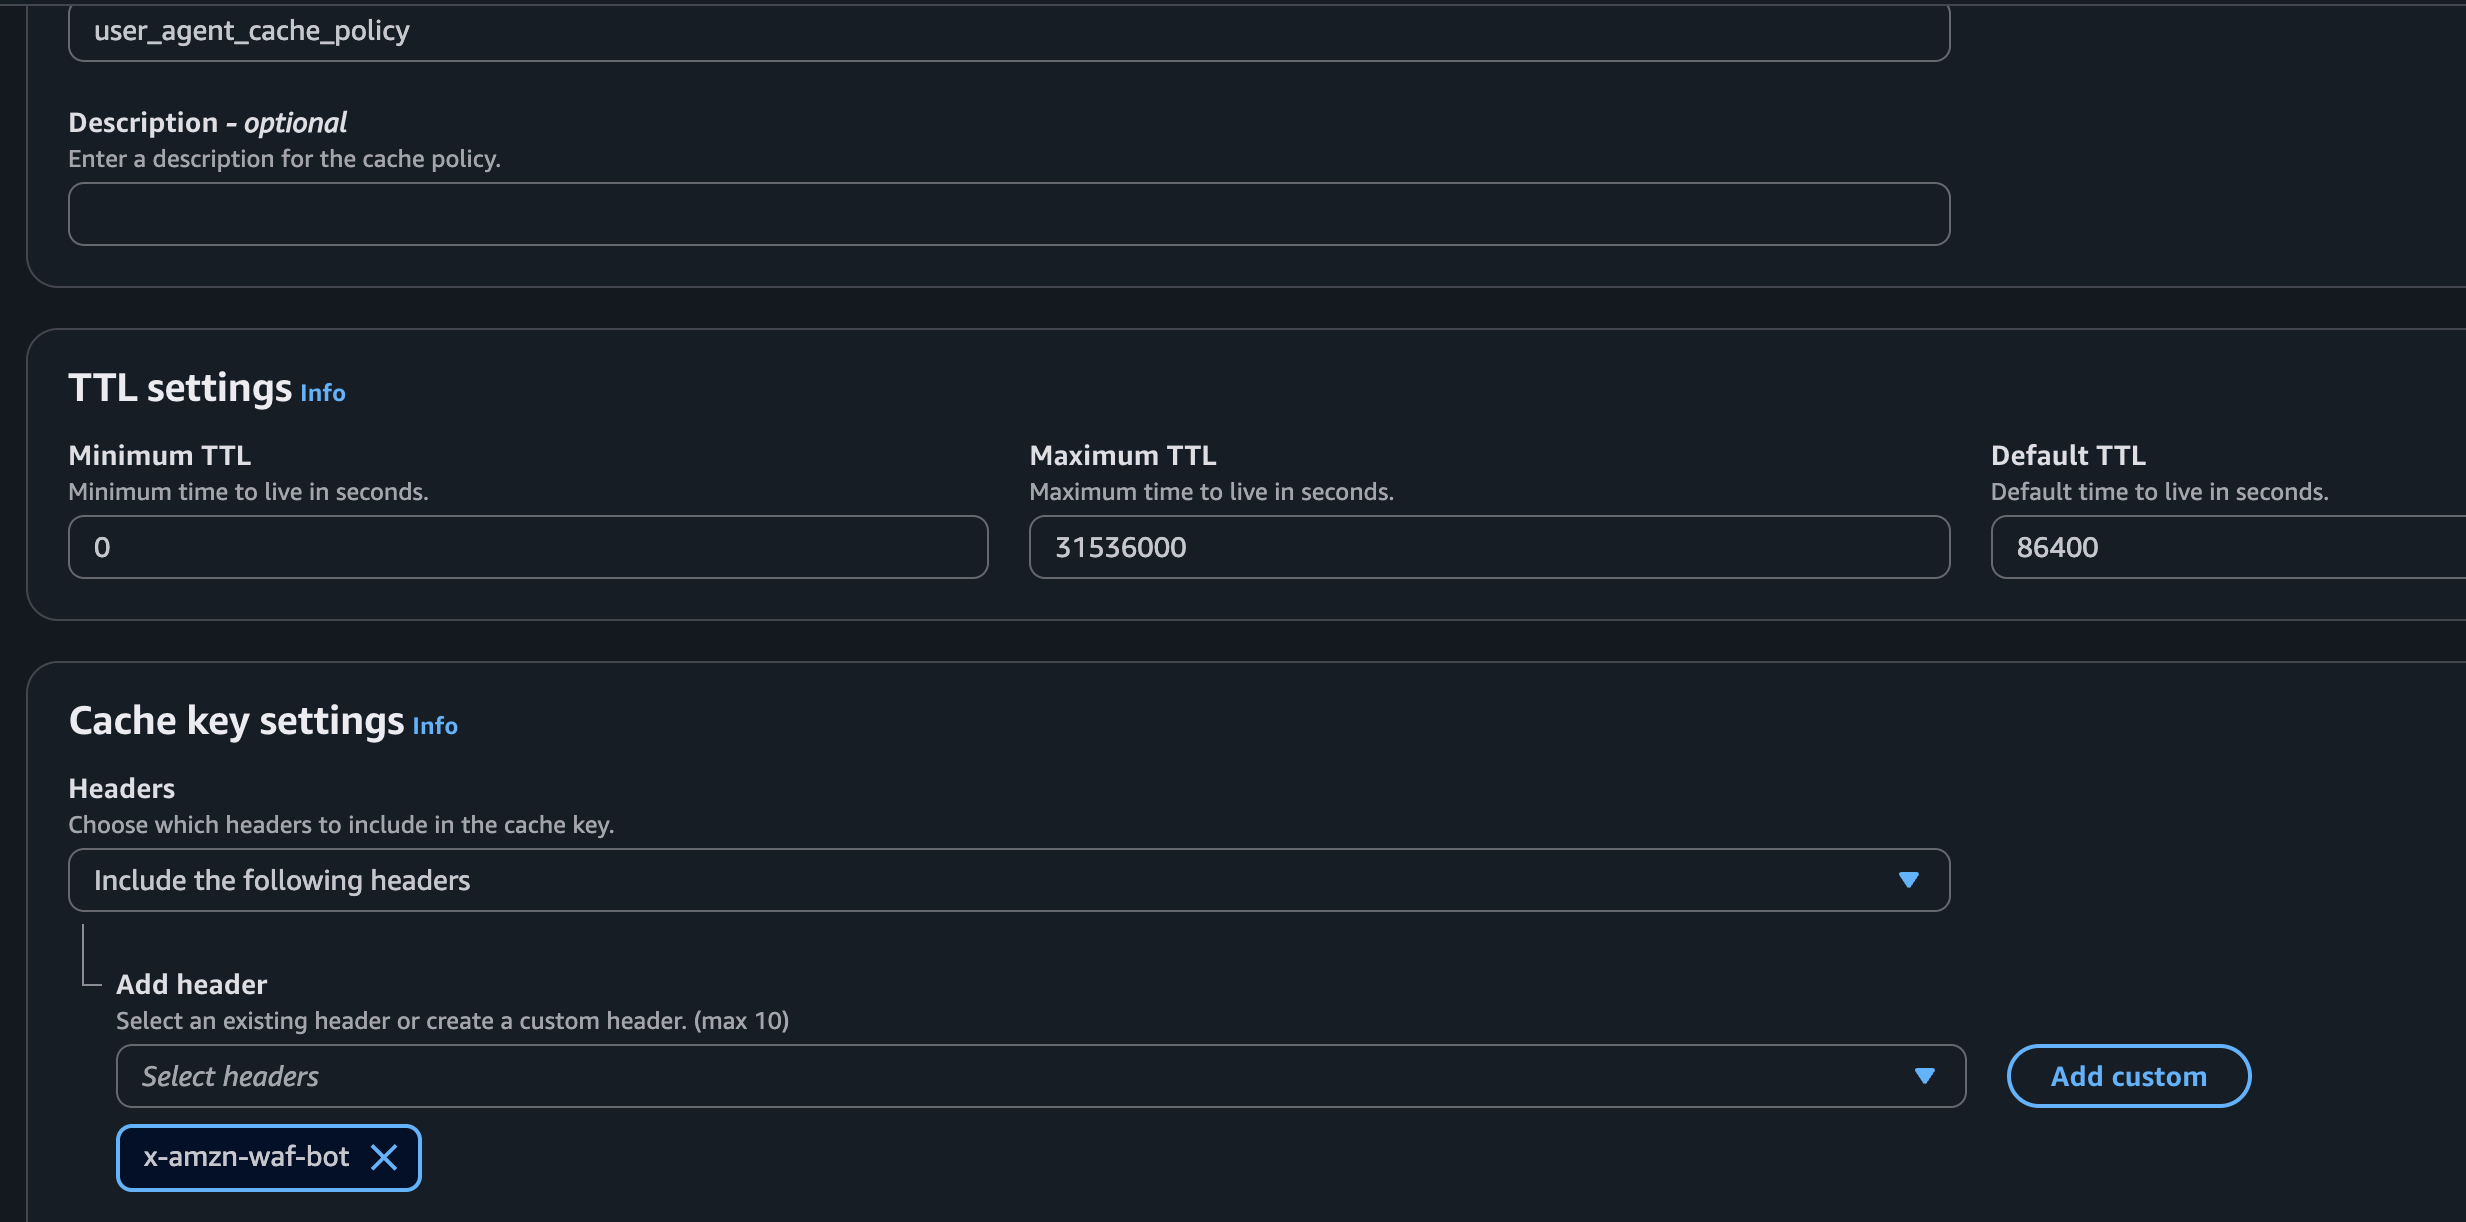
AWS prefixes WAF custom request headers with x-amzn-waf-, so the header named bot above arrives as x-amzn-waf-bot.
NoteMinimum TTL must be
0. With a non-zero Minimum TTL, CloudFront caches Agent Site responses even though they are returned withno-store.
Create the CloudFront Function
Go to CloudFront → Functions and click Create function. You can call it something straightforward like "tollbit_agent_site". Choose the cloudfront-js-2.0 runtime. The older 1.0 runtime cannot change the origin.
Paste the snippet below. If you named the origin something other than tollbit-origin, change BOT_ORIGIN_ID to match.
import cf from 'cloudfront';

const BOT_HEADER = 'x-amzn-waf-bot';

// The Name you gave the Agent Site origin on your distribution.
const BOT_ORIGIN_ID = 'tollbit-origin';

function handler(event) {
  var request = event.request;
  var botRequestHeader = request.headers[BOT_HEADER];

  // The WAF rule inserts this header only on a bot match. Anything other than
  // an exact "true", including the header being absent, is treated as a human.
  if (botRequestHeader && botRequestHeader.value === 'true') {
    cf.selectRequestOriginById(BOT_ORIGIN_ID);
  }

  return request;
}
This function does not proxy the request. When the WAF header is present it tells CloudFront to fetch from your Agent Site origin instead of your own, which lets response headers, cookies, and large pages pass through untouched. Everything else about the request, including the path, query string, method, and User-Agent, is forwarded as-is.
You can check the function in the Test tab before publishing. Choose the Viewer request event type, add a request header named x-amzn-waf-bot with the value true, and run the test. The test only confirms that the code runs without error. It does not show the origin change, so do not expect to see your Agent Site origin in the output.
Click Publish, then Publish function. A function has to be published before it can be attached to a distribution.
Update Your Behavior
Go to Distribution → Behaviors and edit the behavior that regular traffic routes through. If you have multiple, check the one that regular traffic routes through. Make all of the following changes on this one edit page and save once at the end. Saving them one at a time leaves your distribution half configured in between.
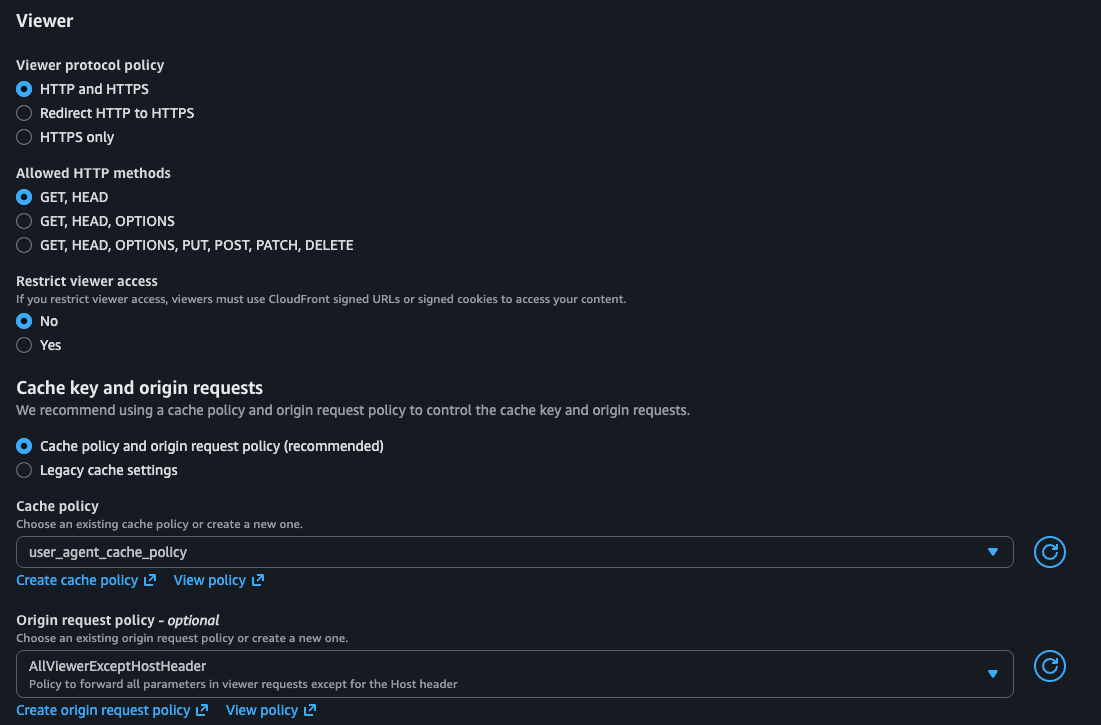
Cache policy
Under Cache key and origin requests, choose Cache policy and origin request policy and select the cache policy you created above.
Origin request policy
On the same panel, set Origin request policy to the AWS managed policy AllViewerExceptHostHeader. It forwards every viewer header, including User-Agent, and lets CloudFront set Host to the origin's own domain. Both matter: without User-Agent, your Agent Site cannot tell which crawler it is serving, and without Host set to your TollBit subdomain, it cannot tell which site the request is for.
It also forwards visitors' cookies to your origin. If your origin doesn't need them, use a custom policy with cookies set to none.
If your behavior already uses a custom origin request policy, you can keep it as long as it forwards User-Agent and does not forward Host.
NoteThis setting applies to all traffic through the behavior, not just bots. Your regular origin will receive requests with its own domain as the
Hostrather than your public domain. Most origins accept this. If yours routes on your public domain and requiresAllViewer, use the Origin request Lambda@Edge setup further down instead, which setsHostitself.AllViewerdoes not work with this setup.
Function association
Under Function associations, on the Viewer request row, set the function type to CloudFront Function and select the function you published.
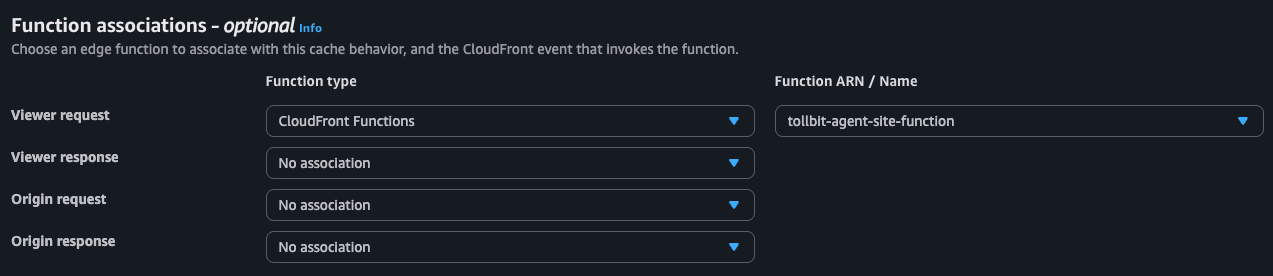
NoteSaving this has the function intercept all traffic to your site. Please ensure you have tested this change.
If you are migrating from one of the Lambda@Edge setups below, remove the old Viewer request or Origin request Lambda association from the behavior in the same save. Leaving both attached will route the request twice.
Updating Your Function
Open the function, edit the code on the Build tab, click Save changes, and then Publish. Distributions pick up the published version automatically. There are no version numbers to update on the behavior.
AWS WAF + CloudFront + Lambda@Edge Viewer Request Agent Site
When To Use ThisThe CloudFront Function setup above is the recommended way to route to Agent Site. Use this Lambda@Edge setup instead if you want requests to fall back to your own origin when the Agent Site is unreachable. This function proxies the request itself and returns your origin's page if the proxy fails.
Do not use this setup if your caching relies on CloudFront viewer headers such as
CloudFront-Viewer-Country,CloudFront-Viewer-City, or the device type headers. CloudFront adds those headers after the viewer request event, so bot requests proxied by this function never receive them. The CloudFront Function setup and the Origin request setup both handle those headers normally.If you already have this setup deployed and working, there is no need to migrate.
Set up Your WAF
This is the same as the CloudFront Function setup above. Create the Web ACL, associate your CloudFront distribution, and add the cloudfront-agent-rule bot detection rule with the Allow action and the bot custom request header.
Create a new Lambda Function
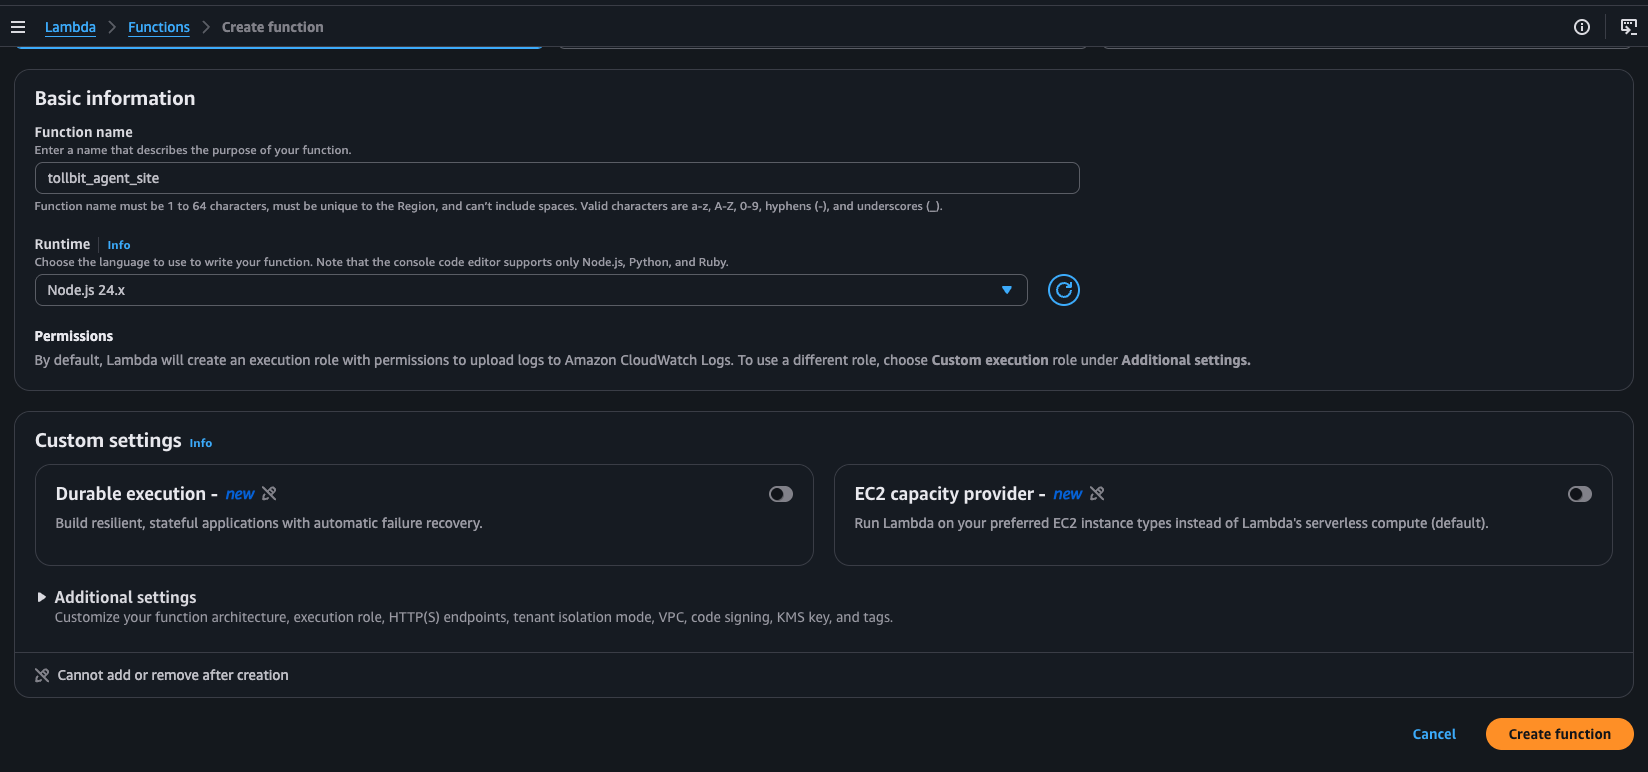
You can call your function name something straightforward like "tollbit_agent_site", and select the latest Node.js Runtime version.
Add the Lambda@Edge Code
Paste the snippet below. This will use the header that the WAF added when it detected a bot to understand if a specific request is a bot request, and route it appropriately.
import https from 'https';

  const BOT_HEADER = 'x-amzn-waf-bot';

  // Only these origin response headers are passed back to the viewer.
  // Everything else (hop-by-hop, x-amz-*, keep-alive, etc.) is dropped,
  // since CloudFront rejects the entire response if a disallowed header is set.
  const ALLOWED_RESPONSE_HEADERS = new Set([
    'content-type', 'content-encoding', 'content-language',
    'set-cookie', 'location', 'vary', 'etag', 'last-modified',
    'expires', 'retry-after', 'www-authenticate', 'x-robots-tag'
  ]);

  // Viewer-request lambdas are killed at 5s total; time out the origin
  // fetch earlier so we can still fail open.
  const PROXY_TIMEOUT_MS = 4000;

  const proxy = (url, reqHeaders) => new Promise((resolve, reject) => {
    const req = https.get(url, { headers: reqHeaders }, (res) => {
      const chunks = [];
      res.on('data', chunk => chunks.push(chunk));
      res.on('error', reject);
      res.on('end', () => resolve({
        status: res.statusCode,
        headers: res.headers,
        body: Buffer.concat(chunks)
      }));
    });
    req.setTimeout(PROXY_TIMEOUT_MS, () => req.destroy(new Error('tollbit origin timeout')));
    req.on('error', reject);
  });

  export const handler = async (event) => {
    const request = event.Records[0].cf.request;
    const headers = request.headers;

    const isBot = headers[BOT_HEADER]?.[0]?.value === 'true';

    if (!isBot) {
      return request;
    }

    try {
      const host = headers['host'][0].value;
      const tollbitDomain = `tollbit.${host.replace(/^www\./, '')}`;

      const reqHeaders = Object.fromEntries(
        Object.entries(headers).map(([k, v]) => [k, v[0].value])
      );
      reqHeaders['host'] = tollbitDomain;
      delete reqHeaders[BOT_HEADER]; // internal signal, don't forward it

      const qs = request.querystring ? `?${request.querystring}` : '';
      const { status, headers: resHeaders, body } = await proxy(
        `https://${tollbitDomain}${request.uri}${qs}`,
        reqHeaders
      );

      const cfHeaders = {};
      for (const [key, value] of Object.entries(resHeaders)) {
        if (!ALLOWED_RESPONSE_HEADERS.has(key.toLowerCase())) continue;
        const values = Array.isArray(value) ? value : [value];
        cfHeaders[key.toLowerCase()] = values.map(v => ({ key, value: v }));
      }
      cfHeaders['cache-control'] = [{ key: 'Cache-Control', value: 'no-store' }];

      return {
        status: String(status),
        headers: cfHeaders,
        bodyEncoding: 'base64',
        body: body.toString('base64')
      };
    } catch (err) {
      console.error('tollbit proxy failed, falling back to origin:', err.message);
      return request; // fail open: serve normal origin content
    }
  };
Deploy the Lambda first
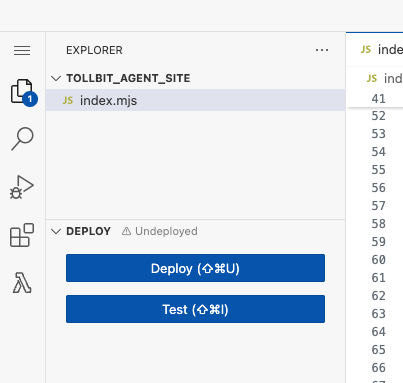
On the left tab, click “Deploy”.
Deploy to Lambda@Edge
Pro TipBefore deploying, ensure that your site’s
tollbitsubdomain is set up and running correctly. Otherwise this will cause errors in the lambda.
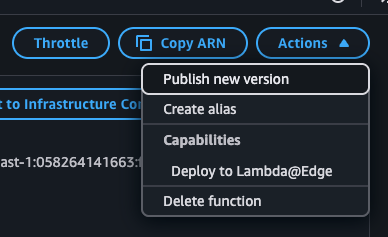
Scroll to the top, click the “Actions” dropdown, and Deploy to Lambda@Edge under Capabilities.
Ensure you pick your Cloudfront distribution and that the event is “Viewer request”. Once done, click deploy at the bottom.
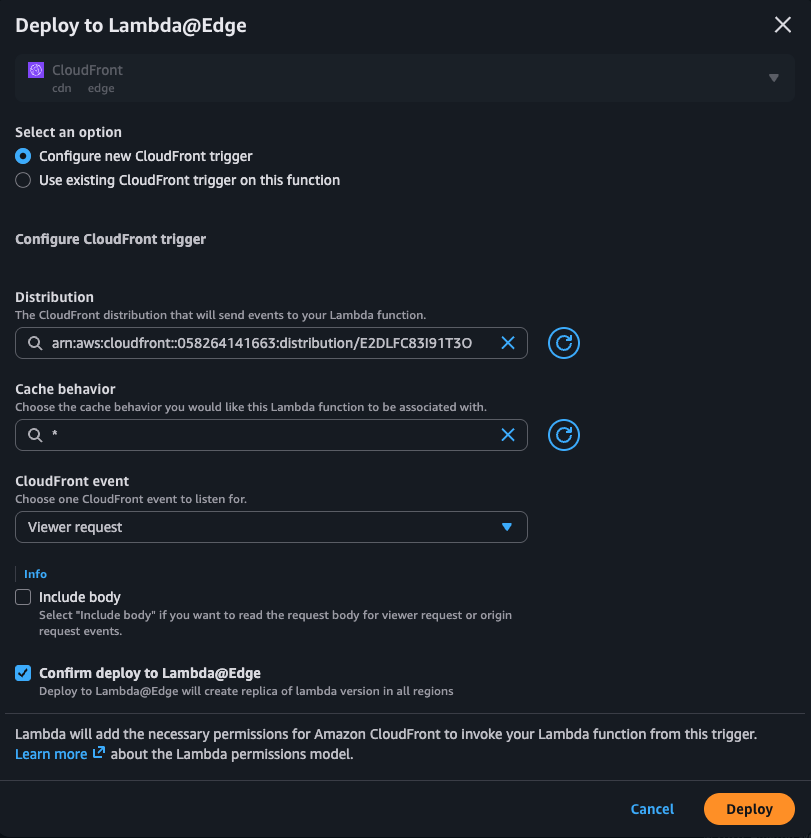
NoteDeploying this has the lambda intercept all traffic to your site. Please ensure you have tested this change.
If you run into a deploy error and permissions issue, you will need to update your lambda’s execution role.
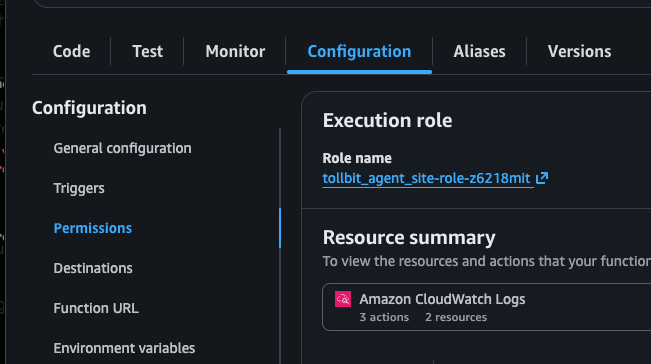
Click on the “Configure” tab, and then on the left, click on “Permissions” and click on the blue highlighted role name. In this case it would be “tollbit_agent_site-role-z6218mit”
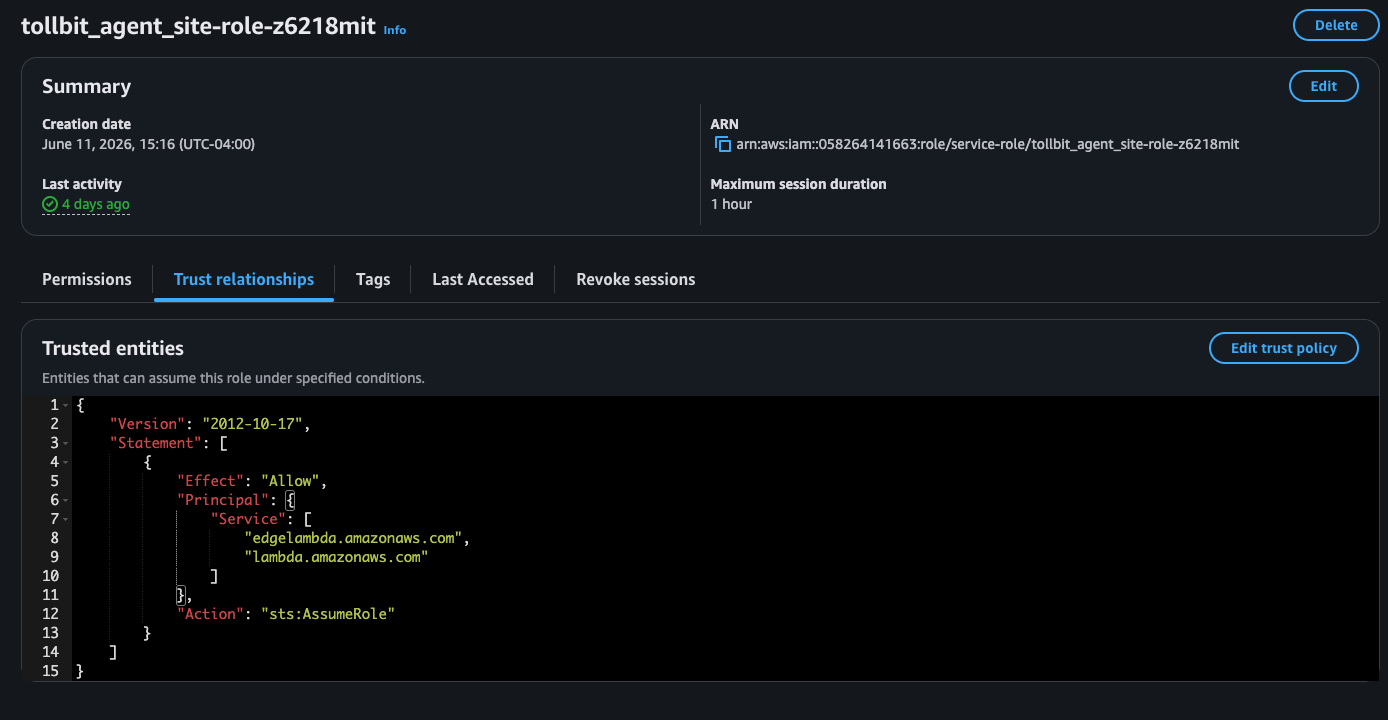
Go to the Trust Relationship tab and edit the Trust Policy and make sure it contains the following block. Make sure to click “Update Policy” at the bottom after updating.
{
    "Version": "2012-10-17",
    "Statement": [
        {
            "Effect": "Allow",
            "Principal": {
                "Service": [
                    "edgelambda.amazonaws.com",
                    "lambda.amazonaws.com"
                ]
            },
            "Action": "sts:AssumeRole"
        }
    ]
}
Once you update this, you can try deploying the Lambda@Edge to your cloudfront distribution again. You may need to wait a few minutes and refresh the lambda page before the permissions propagate.
Updating your Lambda
If you need to update your lambda, you can follow these steps.
Step 1 - Go back to the Lambda code editor and edit the code, and click Deploy once you are done
Step 2 - Under the actions drop down at the top, click Publish New Version
Step 3 - Take note of the latest version number, these will be incrementing numbers
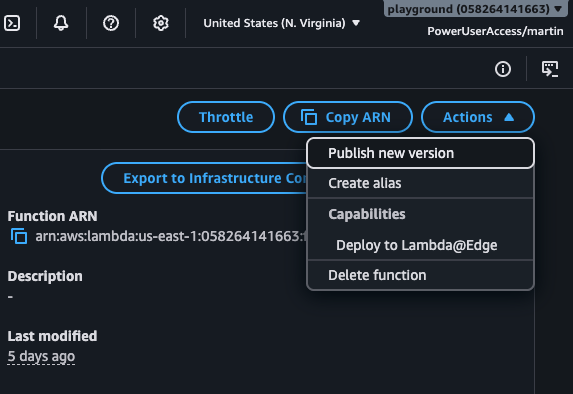
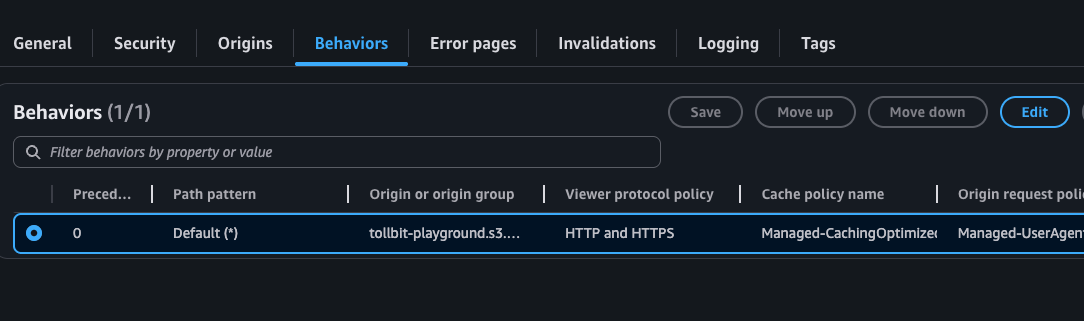
Step 4 - Go to your cloudfront distribution and go to Behaviors, and check the default behavior. If you have multiple, check the one that regular traffic routes through, and then click edit.
Step 5 - Scroll to the bottom of this next page and update the version number of your lambda. You will just edit the number all the way at the end to match the newly updated version number.
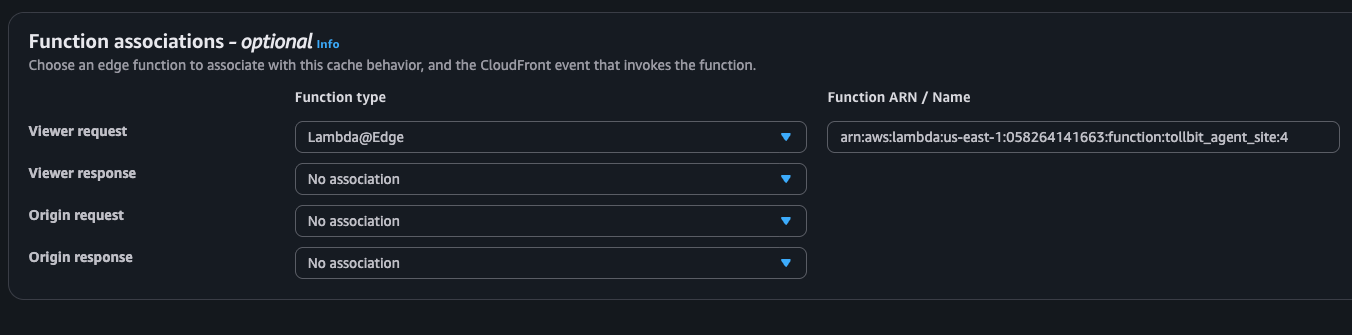
AWS WAF + CloudFront + Lambda@Edge Origin Route To Agent Site
This is an alternate to the setups above. It routes detected bots to your Agent Site in the same way, but attaches the Lambda to the Origin request event instead of Viewer request, and uses CloudFront's cache key to keep bot and human responses separate.
When To Use ThisThe CloudFront Function setup above is the recommended way to route to Agent Site. Use this Lambda@Edge setup instead if:
- Your origin requires the
AllViewerorigin request policy, because it routes on your public domain. This function setsHostfor the Agent Site request itself, so either origin request policy works.- Your distribution serves more than one website. See the multi-domain note below.
This setup cannot be used with a CloudFront VPC origin. CloudFront does not allow Lambda@Edge on origin events for VPC origins. Use the CloudFront Function setup instead.
Set up Your WAF
This is the same as the CloudFront Function setup above. Create the Web ACL, associate your CloudFront distribution, and add the cloudfront-agent-rule bot detection rule with the Allow action and the bot custom request header.
AWS prefixes WAF custom request headers with x-amzn-waf-, so a header named bot arrives as x-amzn-waf-bot.
Update Your Cache Policy
This step keeps a human from being served a bot response, and a bot from being served a human response. The integration will not work correctly without it.
Go to CloudFront → Policies → Cache and create a cache policy. You can also edit your existing one, as long as it is not an AWS managed policy, since those cannot be edited.
If your behavior currently uses an AWS managed policy such as CachingOptimized, a new policy does not inherit its settings. Copy them over before adding the header, in particular Compression support for Gzip and Brotli and the Default and Maximum TTL values. Otherwise your site loses compression and its caching behavior changes when you switch policies.
- Under Headers, choose Include the following headers and add
x-amzn-waf-bot, along with any viewer headers your caching already relies on, such asCloudFront-Viewer-Country. - Set Minimum TTL to
0. - Leave query strings and cookies matching whatever your distribution uses today.
Then go to Distribution → Behaviors, edit the behavior that regular traffic routes through, and attach the policy under Cache key and origin requests.
NoteMinimum TTL must be
0. With a non-zero Minimum TTL, CloudFront caches Agent Site responses even though they are returned withno-store.
Update Your Origin Request Policy
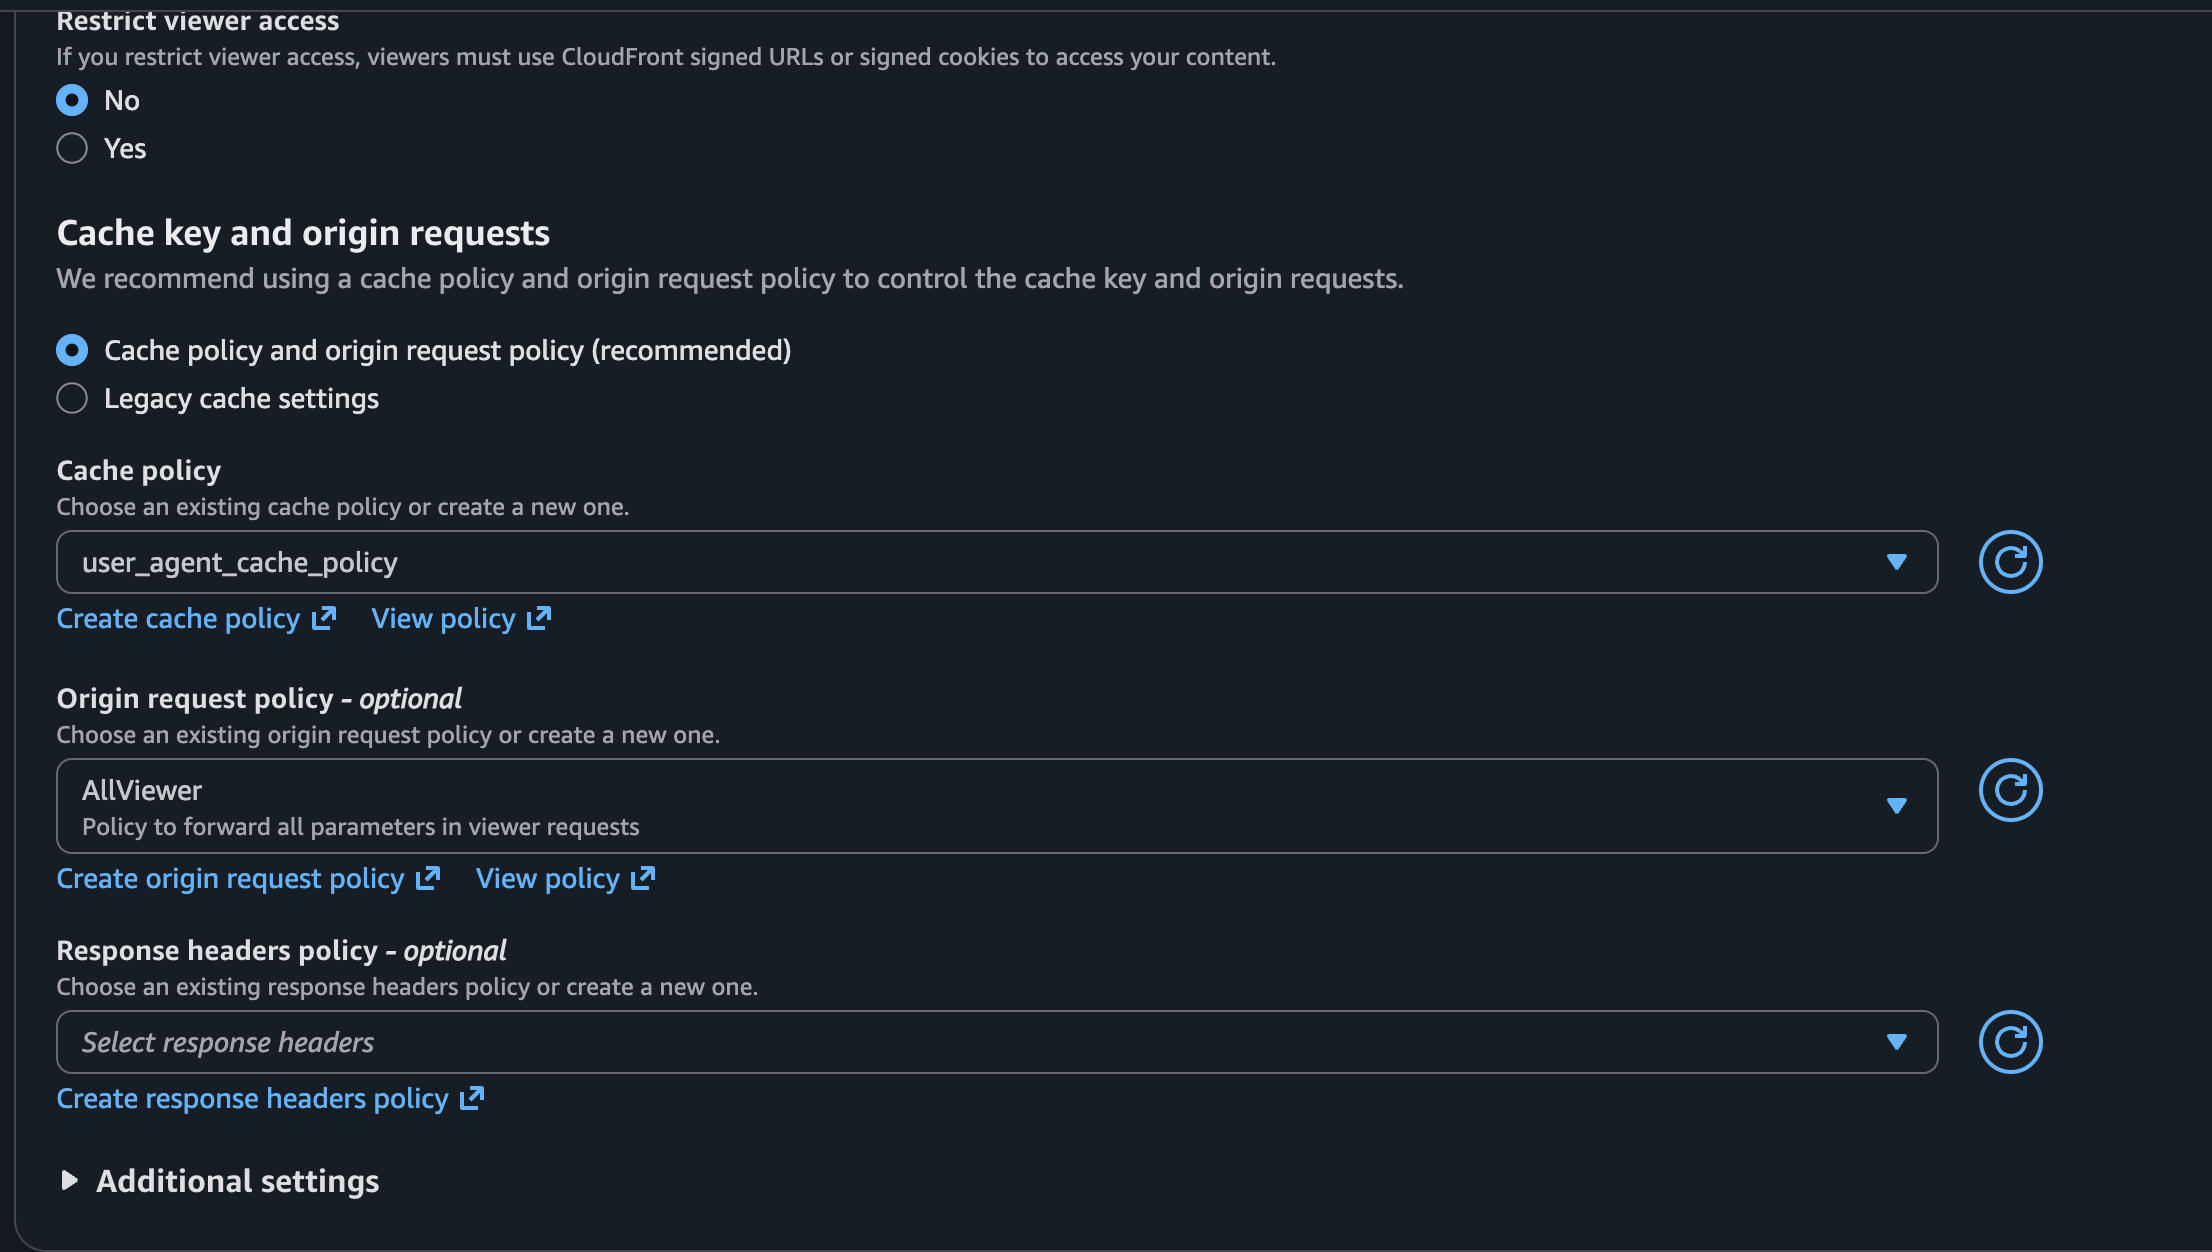
Your behavior needs an origin request policy that forwards User-Agent. Without one, CloudFront replaces User-Agent with the string Amazon CloudFront before sending the request on, and your Agent Site will not be able to tell which crawler it is serving.
If your distribution already uses an origin request policy that forwards User-Agent, you can keep it. This setup does not require you to change it.
If you do not have one, set Origin request policy on the same Behaviors edit screen to one of the AWS managed policies below. Both forward everything the Agent Site needs. The only difference between them is the Host header, and the Lambda sets Host itself for the Agent Site request, so either one will work.
AllViewerforwards every viewer header, includingHost. Your origin will receive requests with your public domain as theHost.AllViewerExceptHostHeaderforwards everything exceptHost. CloudFront substitutes your origin's own domain instead.
NoteThis setting applies to all traffic through the behavior, not just bots, so pick the one your origin already expects.
Only choose
AllViewerif your origin accepts requests for your public domain. Origins that route by hostname, such as an ALB with host based rules or a platform where the custom domain has not been added, will reject aHostthey do not recognize. This returns a502for regular visitors.If
AllVieweris greyed out and cannot be selected, your behavior's origin is an S3 bucket, an API Gateway, or a Lambda function URL. Those origins requireHostto be their own domain, so CloudFront blocks the policy. UseAllViewerExceptHostHeaderinstead.
Create a new Lambda Function
This is the same as the Viewer request setup. You can call your function name something straightforward like "tollbit_agent_site", and select the latest Node.js Runtime version.
Add the Lambda@Edge Code
Paste the snippet below and change TOLLBIT_DOMAIN on the second line to your site's TollBit subdomain.
This function does not proxy the request. Instead it rewrites the origin so that CloudFront fetches from your Agent Site directly, which lets response headers, cookies, and large pages pass through untouched.
const BOT_HEADER = 'x-amzn-waf-bot';

// Change this to your site's TollBit subdomain.
const TOLLBIT_DOMAIN = 'tollbit.example.com';

export const handler = async (event) => {
  const request = event.Records[0].cf.request;

  // The WAF rule inserts this header only on a bot match. Anything other than
  // an exact "true", including the header being absent, is treated as a human.
  if (request.headers[BOT_HEADER]?.[0]?.value !== 'true') {
    return request;
  }

  request.origin = {
    custom: {
      domainName: TOLLBIT_DOMAIN,
      port: 443,
      protocol: 'https',
      path: '',
      sslProtocols: ['TLSv1.2'],
      readTimeout: 30,
      keepaliveTimeout: 5,
      customHeaders: {}
    }
  };
  request.headers.host = [{ key: 'Host', value: TOLLBIT_DOMAIN }];

  // The cache key is computed before this event fires, so removing the header
  // here does not affect where the response is stored.
  delete request.headers[BOT_HEADER];

  return request;
};
NoteIf your distribution serves more than one domain, a single hardcoded
TOLLBIT_DOMAINwill send every bot request to the same Agent Site, no matter which of your sites was requested.In that case, work out the domain from the visitor's host instead. Replace the
TOLLBIT_DOMAINconstant with the following, and usetollbitDomainin place ofTOLLBIT_DOMAINfurther down:const host = request.headers.host[0].value; const tollbitDomain = `tollbit.${host.replace(/^www\./, '')}`;This requires the
AllViewerorigin request policy, becauseAllViewerExceptHostHeaderreplacesHostwith your origin's own domain before the function runs.You should also add
Hostto your cache policy headers. CloudFront does not includeHostin the cache key by default, so without it every domain on the distribution shares the same cached objects.
Deploy the Lambda first
On the left tab, click "Deploy".
Deploy to Lambda@Edge
Pro TipBefore deploying, ensure that your site's
tollbitsubdomain is set up and running correctly. Unlike the Viewer request setup, this function cannot fall back to your origin if the Agent Site is unreachable. CloudFront will return an error to the visitor instead.
Scroll to the top, click the "Actions" dropdown, and choose Deploy to Lambda@Edge under Capabilities.
Pick your CloudFront distribution and set the event to "Origin request". Once done, click deploy at the bottom.
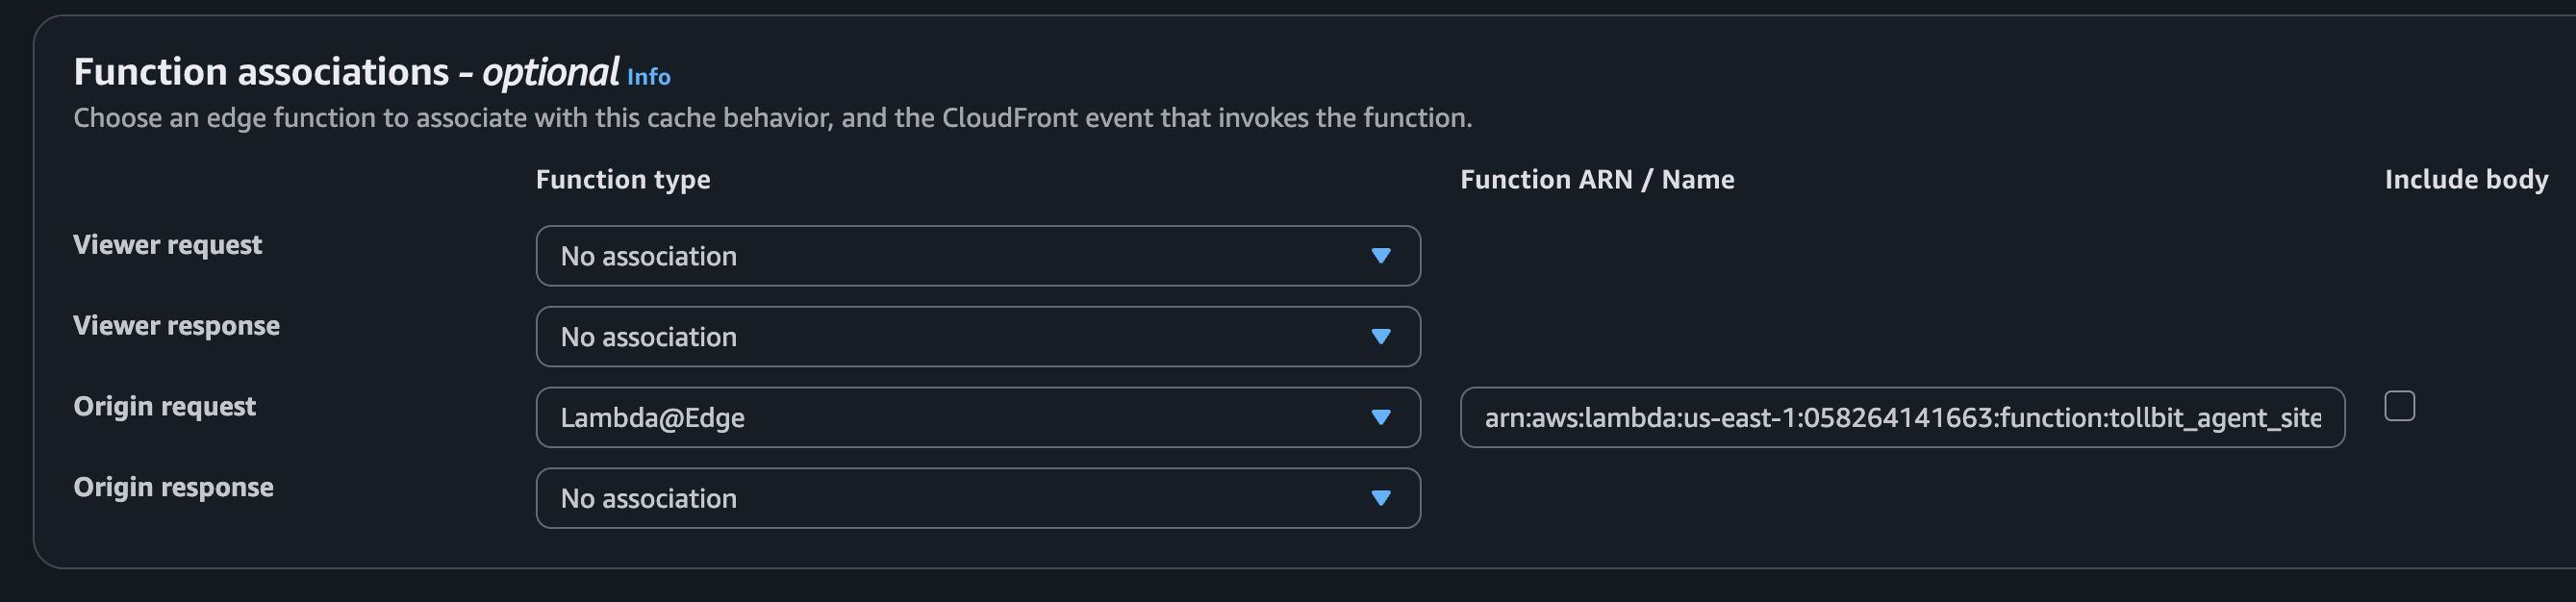
If you are migrating from the Viewer request setup, remove the old Viewer request function association from the behavior at the same time. Leaving both attached will proxy the request twice.
The execution role requirements and the "Updating your Lambda" steps are the same as the Viewer request setup above.
Order of Operations
Apply the changes in this order:
- Update the cache policy and origin request policy, and wait for the distribution to show Deployed.
- Attach the Lambda to the Origin request event.
The order matters. If you attach the Lambda first, there is a window where x-amzn-waf-bot is not yet part of the cache key. During that window, Agent Site responses can be cached and then served to human visitors, which is what this setup is meant to prevent. If you update the policies first, the worst case is that a bot receives a cached human page until the entry expires.
No invalidation is needed. Adding x-amzn-waf-bot to your cache policy changes the cache key for every object, so entries cached before the change are no longer matched and will age out on their own. Try to keep the gap between the two steps short, as anything cached in between will expire on your normal TTL.
ALB + Lambda Route to Agent Site
If you do not have CloudFront set up, but instead are having inbound request hit your Application Load Balancer directly, you should be able to set up Lambda with your ALB to set up Agent Site routing.
Create a Lambda
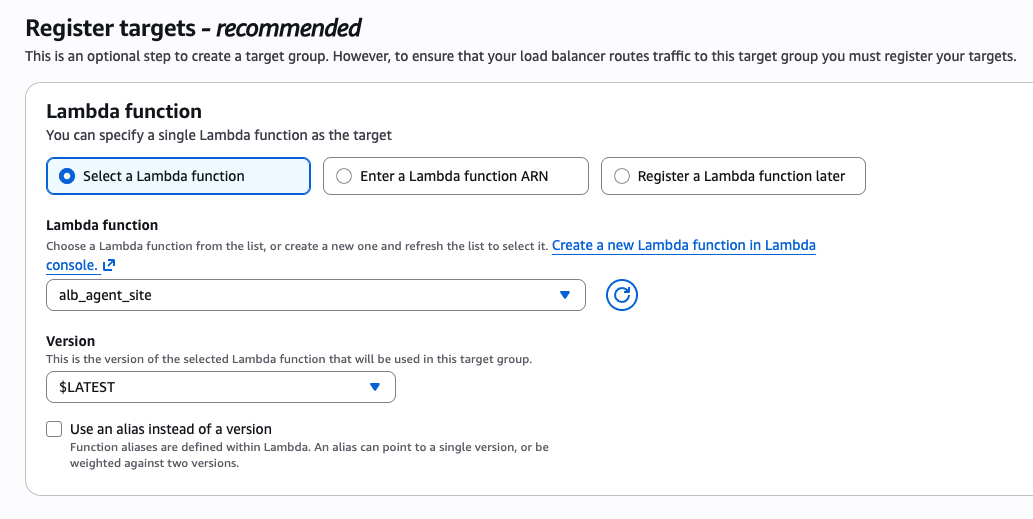
Create a Lambda and put in the following code block. Be sure to update the TOLLBIT_DOMAIN with your actual TollBit subdomain. Deploy this lambda code. You can also publish versions of this lambda and use the versioned ARN in the target group, or you have have the target group point to $LATEST.
// Customer config: set this to your dedicated TollBit subdomain
const TOLLBIT_DOMAIN = 'tollbit.example.com';

export const handler = async (event) => {
  // ALB does not url-decode query params, so URLSearchParams would double-encode them.
  const qs = Object.entries(event.queryStringParameters || {})
    .map(([k, v]) => `${k}=${v}`)
    .join('&');
  const url = `https://${TOLLBIT_DOMAIN}${event.path}${qs ? `?${qs}` : ''}`;

  const headers = { ...(event.headers || {}), host: TOLLBIT_DOMAIN };
  delete headers['accept-encoding'];

  try {
    const response = await fetch(url, {
      method: event.httpMethod,
      headers: { ...headers, host: TOLLBIT_DOMAIN },
      body: ['GET', 'HEAD'].includes(event.httpMethod) ? undefined : event.body,
      redirect: 'manual'
    });

    const arrayBuffer = await response.arrayBuffer();

    return {
      statusCode: response.status,
      isBase64Encoded: true,
      headers: {
        ...Object.fromEntries(
          [...response.headers].filter(
            ([k]) => k !== 'content-encoding' && k !== 'content-length'
          )
        ),
        'cache-control': 'no-store'
      },
      body: Buffer.from(arrayBuffer).toString('base64')
    };
  } catch (err) {
    console.error('Tollbit proxy error:', err);
    return {
      statusCode: 502,
      headers: { 'content-type': 'text/plain' },
      body: 'Bad Gateway'
    };
  }
};
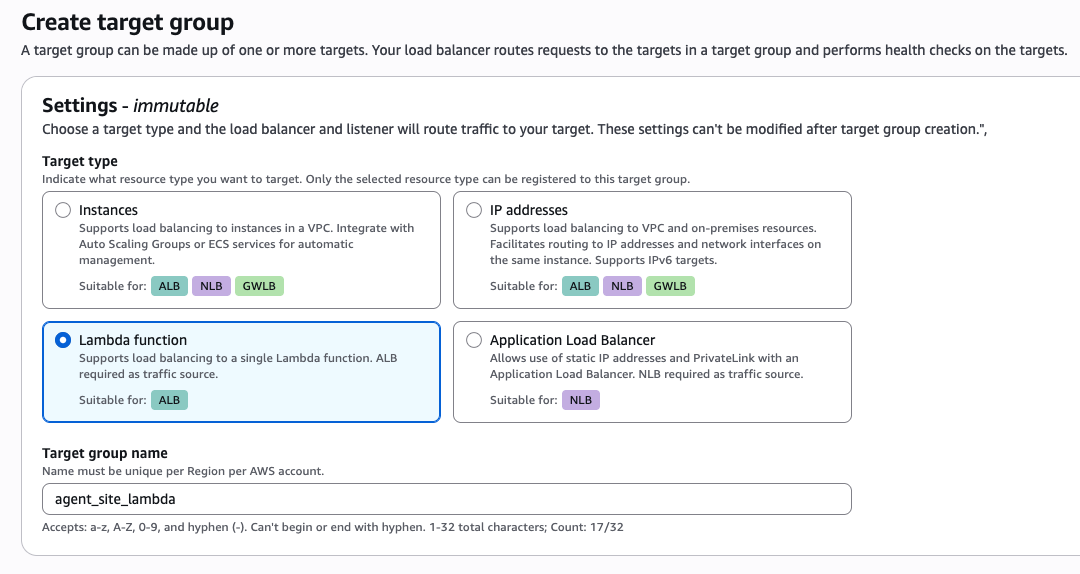
Next, create a target group for this Lambda by going to the EC2 Console -> Target Groups -> Create Target Group.
Create an ALB Listener Rule
We can create a Listener rule under your default ALB Listener to inspect incoming user agents and route bot user agents to the lambda. This takes the place of the WAF in the above integrations. Go into the Listener and create a new rule. Create a condition using Regex matching for the header user-agent. Each condition value has a 128 character limit and each rule allows at most five values, so the list below is split into eight values across two rules. Add the first five values to this rule, then create a second rule with the same condition type, action and a priority right after it, and add the remaining three values to it.
(?i).*(agentnativesearchbot|ai2bot|aionbot|aiwebindex|amazonbot|amzn-searchbot|amzn-user|anthropic-ai).*

(?i).*(atevesearchsourceurldiscovery|azureai-searchbot|bravebot|bytespider|ccbot|chatgpt-user|claude-code|claude-searchbot).*

(?i).*(claude-user|claude-web|claude/|claudebot|cloudflarebrowserrenderingcrawler|cohere-ai|comet/|cursor/|desearchbot|devin/).*

(?i).*(diffbot|duckassistbot|exabot|exasearchbot|exauser|fellou|gensparkbot|githubcopilotruntime|goose/|gptbot|grok-agent).*

(?i).*(grokbot|hermes-agent|iaskspider|ibou-search|iboubot|isonsearchbot|keenable|kimi-searchbot|kimibot|lightpanda|linkupbot).*

(?i).*(manus-user|meta-externalagent|meta-externalfetcher|meta-webindexer|mistralai-user|mojeekbot|mysearchbot|oai-adsbot).*

(?i).*(oai-searchbot|openclaw|perplexity-user|perplexity/|perplexitybot|rednote-websearch-bot|reflectionbot|shap-user|shapbot).*

(?i).*(sofyabot|talarionsearchbot|timpibot|youbot).*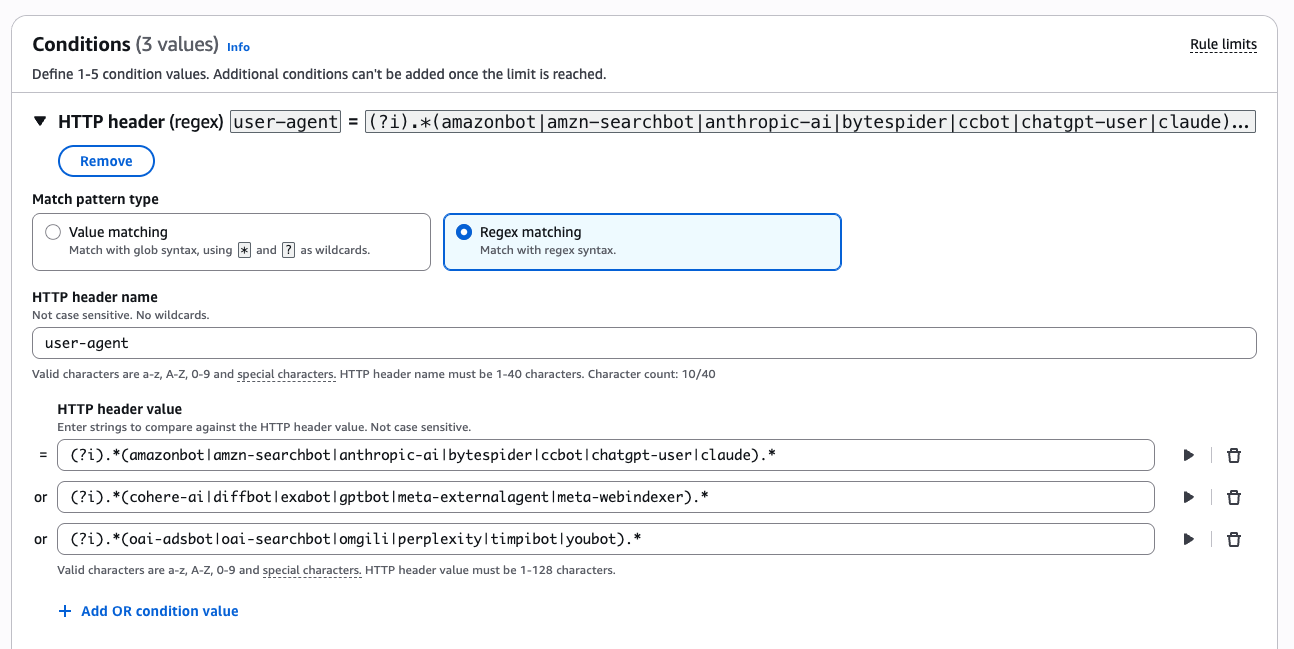
Ensure that you forward this to the lambda target group with weight 1.
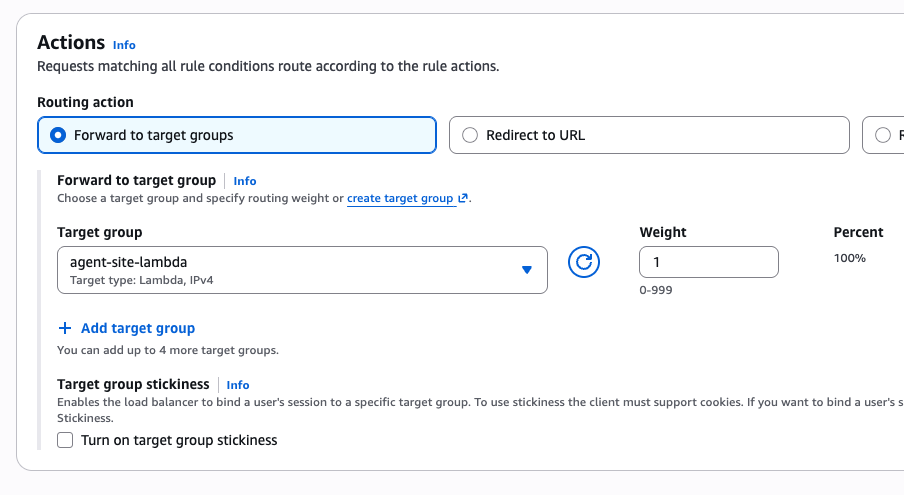
Go through the rest of the creation flow and ensure that this rule evaluates with a high priority (we use 1).
NoteThis will start rerouting requests hitting your ALB. Ensure that you've tested this thoroughly before deploying to your production website.
Just Lambda + CloudFront Route To Agent Site (No WAF)
If you'd like to set this up without WAF managing the bot detection and want to only use Lambda and CloudFront, use the following Lambda instead. This will do the bot user agent check directly within the Lambda.
import https from 'https';

  const TOLLBIT_USER_AGENTS = [
    'AgentNativeSearchBot', 'AI2Bot', 'AionBot', 'AIWebIndex', 'Amazonbot',
    'Amzn-SearchBot', 'Amzn-User', 'anthropic-ai',
    'AteveSearchSourceUrlDiscovery', 'AzureAI-SearchBot', 'Bravebot',
    'Bytespider', 'CCBot', 'ChatGPT-User', 'claude-code', 'Claude-SearchBot',
    'Claude-User', 'Claude-Web', 'Claude/', 'ClaudeBot',
    'CloudflareBrowserRenderingCrawler', 'cohere-ai', 'Comet/', 'Cursor/',
    'DesearchBot', 'Devin/', 'Diffbot', 'DuckAssistBot', 'Exabot',
    'ExaSearchBot', 'ExaUser', 'Fellou', 'Gensparkbot', 'GitHubCopilotRuntime',
    'goose/', 'GPTBot', 'grok-agent', 'GrokBot', 'Hermes-Agent', 'iaskspider',
    'ibou-search', 'IbouBot', 'IsonSearchBot', 'Keenable', 'Kimi-SearchBot',
    'KimiBot', 'Lightpanda', 'LinkupBot', 'Manus-User', 'meta-externalagent',
    'meta-externalfetcher', 'meta-webindexer', 'MistralAI-User', 'MojeekBot',
    'MySearchBot', 'OAI-AdsBot', 'OAI-SearchBot', 'OpenClaw', 'Perplexity-User',
    'Perplexity/', 'PerplexityBot', 'rednote-websearch-bot', 'Reflectionbot',
    'Shap-User', 'ShapBot', 'SofyaBot', 'TalarionSearchBot', 'Timpibot',
    'YouBot'
  ];

  const TOLLBIT_UA_REGEX = new RegExp(TOLLBIT_USER_AGENTS.join('|'), 'i');

  const matchesUserAgent = (ua) => ua && TOLLBIT_UA_REGEX.test(ua);

  // Only these origin response headers are passed back to the viewer.
  // Everything else (hop-by-hop, x-amz-*, keep-alive, etc.) is dropped,
  // since CloudFront rejects the entire response if a disallowed header is set.
  const ALLOWED_RESPONSE_HEADERS = new Set([
    'content-type', 'content-encoding', 'content-language',
    'set-cookie', 'location', 'vary', 'etag', 'last-modified',
    'expires', 'retry-after', 'www-authenticate', 'x-robots-tag'
  ]);

  // Viewer-request lambdas are killed at 5s total; time out the origin
  // fetch earlier so we can still fail open.
  const PROXY_TIMEOUT_MS = 4000;

  const proxy = (url, reqHeaders) => new Promise((resolve, reject) => {
    const req = https.get(url, { headers: reqHeaders }, (res) => {
      const chunks = [];
      res.on('data', chunk => chunks.push(chunk));
      res.on('error', reject);
      res.on('end', () => resolve({
        status: res.statusCode,
        headers: res.headers,
        body: Buffer.concat(chunks)
      }));
    });
    req.setTimeout(PROXY_TIMEOUT_MS, () => req.destroy(new Error('tollbit origin timeout')));
    req.on('error', reject);
  });

  export const handler = async (event) => {
    const request = event.Records[0].cf.request;
    const headers = request.headers;

    const userAgent = headers['user-agent']?.[0]?.value ?? '';

    if (!matchesUserAgent(userAgent)) {
      return request;
    }

    try {
      const host = headers['host'][0].value;
      const tollbitDomain = `tollbit.${host.replace(/^www\./, '')}`;

      const reqHeaders = Object.fromEntries(
        Object.entries(headers).map(([k, v]) => [k, v[0].value])
      );
      reqHeaders['host'] = tollbitDomain;

      const qs = request.querystring ? `?${request.querystring}` : '';
      const { status, headers: resHeaders, body } = await proxy(
        `https://${tollbitDomain}${request.uri}${qs}`,
        reqHeaders
      );

      const cfHeaders = {};
      for (const [key, value] of Object.entries(resHeaders)) {
        if (!ALLOWED_RESPONSE_HEADERS.has(key.toLowerCase())) continue;
        const values = Array.isArray(value) ? value : [value];
        cfHeaders[key.toLowerCase()] = values.map(v => ({ key, value: v }));
      }
      cfHeaders['cache-control'] = [{ key: 'Cache-Control', value: 'no-store' }];

      return {
        status: String(status),
        headers: cfHeaders,
        bodyEncoding: 'base64',
        body: body.toString('base64')
      };
    } catch (err) {
      console.error('tollbit proxy failed, falling back to origin:', err.message);
      return request; // fail open: serve normal origin content
    }
  };
Updated 2 days ago